C++多线程编程相关详解笔记
简介 线程/进程
当前机器的单核红利结束
多线程拥有自身优势
API日益成熟,操作系统和标准库已经支持多线程
总结来说:要在数据IO和计算找平衡点
1
2
3
新建process进程单元 linux通过fork和execve windows则通过createProcess
对于进程有signal信号,对于线程不支持这个东西
早期操作系统对多线程支持并不是很好,93年对UNIX和Linux的thread概念提出,posix Threads的标准也确立起来
多线程的特点:是对于内存空间都是共享的
这样很高效的共享数据,在多线程也能充分利用多核的
而且操作系统和标准库都支持多线程编程,Posix Thread
所以用c++都可以用一套标准代码写多线程跑windows和linux
平衡点
数据IO和计算
http的服务如果发生网络瓶颈点一般都会出现在数据io上
而一些数据计算都是在计算瓶颈上
计算服务并不是一味的多线程好
问题
死锁
虽然死锁很烦,但是死锁很容易察觉到问题,不像并发访问数据很难发现问题
乱序
并发访问数据造成的问题
因并发访问,数据错乱,把其他线程资源释放和重复释放
低效率
在多线程切换的时候效率也会低,有些工作还不如单线程工作
新概念
高阶接口: (async,future)
低阶接口:(thread, mutex)
示例 1 2 3 4 5 6 7 8 9 10 11 void helloworld () std ::cout << "hello world\n" ; } int main () std ::thread t (helloworld) ; t.join(); }
1 2 3 4 5 6 7 8 9 10 11 12 13 14 15 16 17 18 19 20 21 22 23 24 25 26 27 28 29 30 31 32 33 34 35 36 37 38 39 40 41 42 43 44 45 46 47 48 49 50 51 52 #include <iostream> #include <thread> #include <cmath> #include <vector> double calculate (double v) return v * v; } template <typename Iter, typename Fun>double visitRange (Iter iterBegin,Iter IterEnd,Fun fun) double v = 0 ; for (auto iter = iterBegin; iter != IterEnd; iter ++){ v += fun(*iter); } return v; }; int main () std ::vector <double > v; for (int i = 0 ; i < 100 ; ++i) { v.push_back(i); } std ::cout << "size:" << v.size() << std ::endl ; double value = 0.0 ; for (auto & info: v) { value += calculate(info); } std ::cout << "value:" << value << std ::endl ; auto iter = v.begin() + (v.size() / 2 ); auto iterEnd = v.end(); double anotherV = 0.0 ; std::thread s([&anotherV, iter, iterEnd]()->double{ anotherV = visitRange(iter, iterEnd, calculate); }); auto halfV = visitRange(v.begin(), iter, calculate); s.join(); std ::cout << "halfV:" << (halfV + anotherV) << std ::endl ; }
取threadid 程序运行中,一部分代码在主线程,一部分在额外线程跑的
有std::this_thread::get_id()得到了线程的threadid
1 std ::cout << "thread id:" << (std ::this_thread::get_id()) << std ::endl ;
sleep 1 2 #include <chrono> //处理时间头 std ::this_thread::sleep_for(std ::chrono::milliseconds(100 ));
资源共享问题 同一个值放给3个thread去算
算出来的汇合值有严重问题
那如何给每个线程一个值,最终结合将各个结果值相加,说白了避免了资源的共享
多线程重要原则
如果没有必要的话,线程间不要共享资源,出错的可能性最低
1 2 3 4 5 6 7 8 9 10 11 12 13 14 15 16 17 18 19 20 21 22 23 24 25 26 27 28 29 30 31 32 33 34 35 36 37 #include <thread> #include <iostream> void printAll (int a, int b, int c) std ::cout << "a:" << a << ",b:" << b << ",c:" << c << std ::endl ; } void add (int a, int b, int & c) c = a+b; } void testThreadInit () int a=3 ; int b=4 ; int c=5 ; std ::thread t ([=]() {printAll(a, b, c);}); t.join(); std ::thread t1 (printAll, a, b, c) ; t1.join(); std ::thread t2 (add ,a ,b, c) ; t2.join(); std ::cout << "after add:" << c << std ::endl ; std ::thread t3 ([=, &c]() { add(a, b, c); }); t3.join(); std ::cout << "after add:" << c << std ::endl ; } int main () testThreadInit(); }
当然如果这样写也可以执行
1 std::thread t2(add ,a ,b, std::ref(c));
在上面的情况下还是推荐用lambda的方式去执行
比如如下情况
1 2 3 4 5 6 7 8 9 10 11 12 void printString (const std ::string & info, const std ::string & info2) std ::cout << "info:" << info << ",info2:" << info2 << std ::endl ; } std ::string s1 ("hello" ) std ::string s2 ("hello2" ) std::thread t4(printString, std::ref(s1), std::ref(s2)); std ::thread t5 ([&]() { printString(s1, s2); }); t4.join(); t5.join();
这样省略很多
构造问题 示例 1 2 3 4 5 6 7 8 9 10 11 12 13 14 15 16 17 18 19 20 21 22 23 24 25 26 27 28 29 30 31 32 33 34 35 36 37 38 39 40 41 42 43 44 45 46 47 48 49 50 51 52 53 54 #include <stdlib.h> #include <fstream> #include <iostream> class Log {public : Log(int id, const std ::string & fileName):m_id(id){ std ::cout << "create id:" << id << std ::endl ; m_f.open(filename.c_str(), std ::fstream::out); } ~Log(){ std ::cout << "bye id:" << m_id << std ::endl ; m_f.close(); } void log (const std ::string & info) std ::cout << info; m_f << info; m_f.flush(); } private : int m_id; std ::fstream m_f; }; void test () static Log log (1 , "log.log" ) log .log ("hello" ); } void test2 () static Log log (2 , "log.log" ) log .log ("world" ); } int main () test(); test2(); std ::cout <<"bye main" << std ::endl ; }
写入文件的是答案是2,world
如果static是在外部,作为单例的存在就没有问题
这跟操作系统有关,以linux为例
1 2 3 4 5 当fstream会打开一个文件 得到文件的指针头,指向文件内容,并将内容写入,内核会刷到磁盘 当第二次log起来又会去一次打开文件,但是文件的指针头还是原来的起点于是就覆盖了,因为文件指针头是一样的
m_f.flush()
1 2 3 写不写也重要,写了就是world不写就是hello,因为flush要等buffer满才会刷入,或者close 如果没加flush,就会在析构的时候进行写入 而这个时候hello的函数栈是后进先出,所以hello是最后写入形成了hello而不是world
原子操作问题 多线程下对共享资源的操作
1 2 3 4 5 6 7 8 9 10 11 12 13 14 class Counter {public : void addCount () m_count++; } int count () const return m_count; } Counter():m_count(0 ){} private : int m_count; };
保证共享资源的操作必须在一个线程内操作并且操作完成才切换线程
原子操作就如上要求
最小不可再分割的操作
用Atomic包装后:写入寄存器, 寄存器加1, 再写入内存这三步就做成一步且不可分割
Java最先实现了Atomic,C++11引入
c++11又做了很多扩展,读写以及比较级造成的接口复杂,简单还是和Java差不多
1 2 3 4 5 6 7 8 9 10 11 12 13 14 15 16 17 18 19 20 21 22 23 24 25 26 27 28 29 30 31 32 33 34 35 36 37 38 #include <atomic> #include <thread> #include <iostream> class Counter {public : void addCount () m_count++; } int count () const return m_count; } Counter():m_count(0 ){} private : std ::atomic<int > m_count; }; void todo (Counter& counter) for (int i = 0 ; i < 1000 ; ++i) { counter.addCount(); } } int main () Counter counter; std ::thread t1 ([&counter]() { todo(counter); }); std ::thread t2 ([&counter]() { todo(counter); }); t1.join(); t2.join(); std ::cout << counter.count() << std ::endl ; }
复杂的情况,内置函数
1 2 3 4 5 m_count.fetch_add(1 );
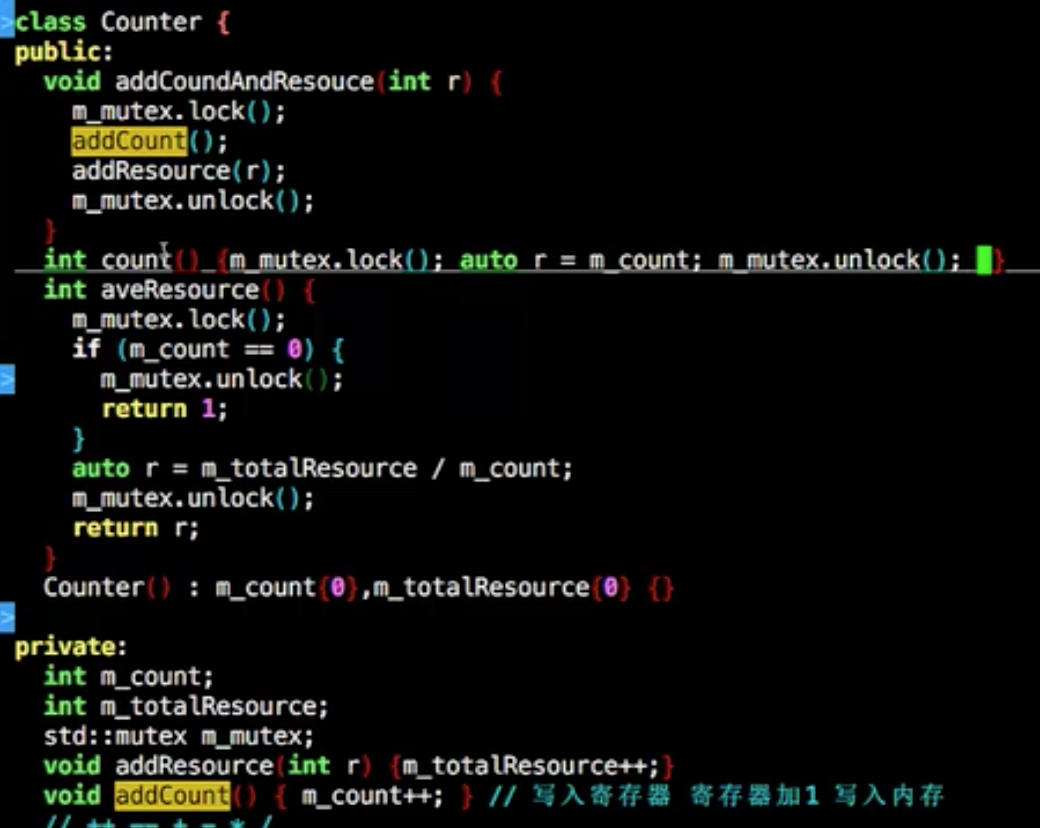
mutex问题 原子操作两个不同的变量进行操作
那这两个不同的变量就分割操作,并不是原子性
1 2 3 4 5 6 7 8 9 10 11 12 13 14 15 16 17 18 19 20 21 22 23 24 25 26 27 28 29 30 31 32 33 34 35 36 37 38 39 40 41 42 43 #include <mutex> #include <atomic> class Counter {public : int count () const return m_count; } void lockMutex () m_mutex.lock(); } void unlockMutex () m_mutex.unlock(); } Counter():m_totalResource(0 ),m_count(0 ){ } void addCount () m_count++; } void addTotalResource () m_totalResource++; } int totalResource () return m_totalResource; } private : std ::mutex m_mutex; std ::atomic<int > m_count; std ::atomic<int > m_totalResource; }; template <class Iter >void readWork (Counter &c , double &totalValue , Iter b , Iter e ){ for (; b != e; ++b) { c.lockMutex(); c.addCount(); c.addTotalResource(); c.unlockMutex(); } }
误用点 小心出现死锁
1 2 3 4 5 6 7 8 9 10 11 12 13 14 15 16 17 18 19 20 21 22 23 24 25 26 27 28 29 30 31 32 33 34 35 36 37 38 39 40 41 42 43 44 45 for (; b != e; ++b) { c.lockMutex(); c.addCount(); c.addTotalResource(); } for (; b != e; ++b) { c.lockMutex(); c.lockMutex(); c.addCount(); c.addTotalResource(); c.unlockMutex(); } void debugPrintInfo (Counter &c) c.lockMutex(); c.unlockMutex(); } for (; b != e; ++b) { c.lockMutex(); debugPrintInfo(c); c.addCount(); c.addTotalResource(); c.unlockMutex(); } void doSomeThing () if (rand()% 10 == 0 ){ throw "bad" ; } else std ::cout << "lucky\n" ; } try { c.lockMutex(); doSomeThing(); c.unlockMutex(); }catch (...){ c.unlockMutex(); }
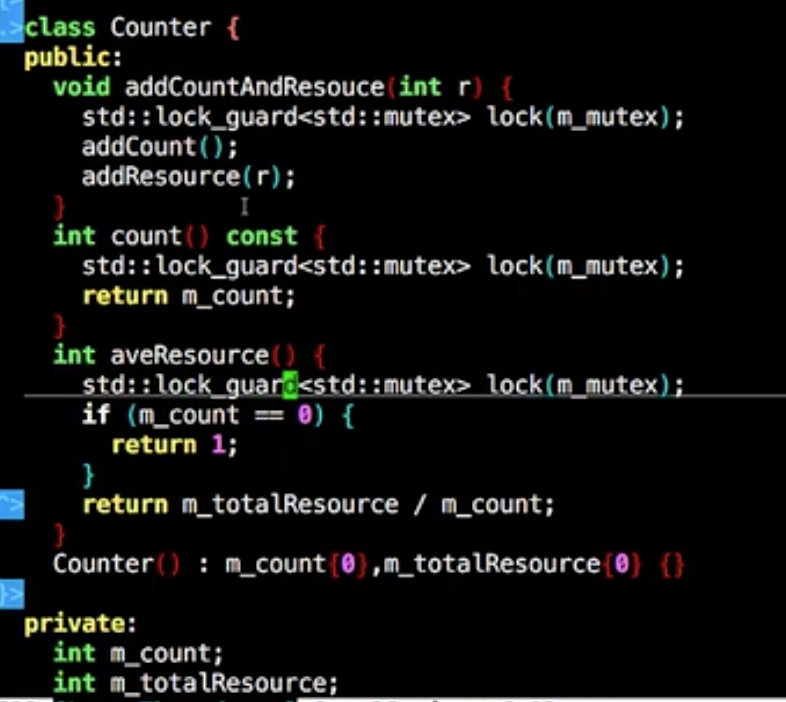
正确使用 在类的内部使用临界区,不暴露出去
这样内部处理掉了每个需要修改数据成员方法的临界区
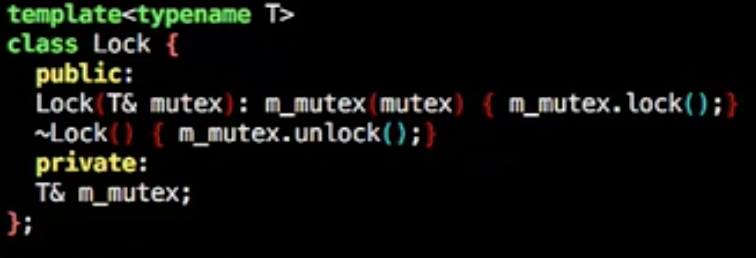
当然也可以这样做,通过模板类mutex锁包装变量在函数栈退出的时候解锁
lock_guard
用std的lock_guard可以替换掉自己实现的模板类
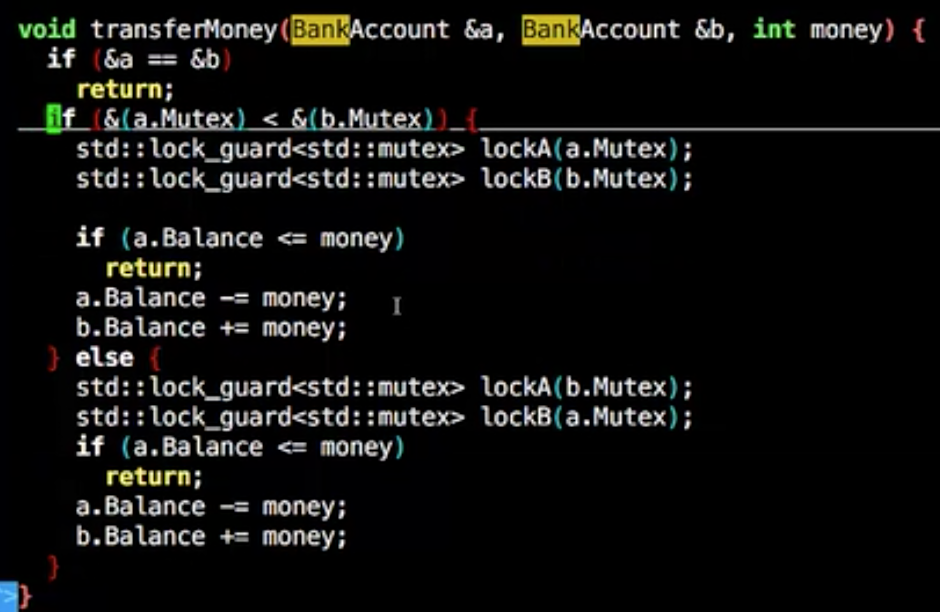
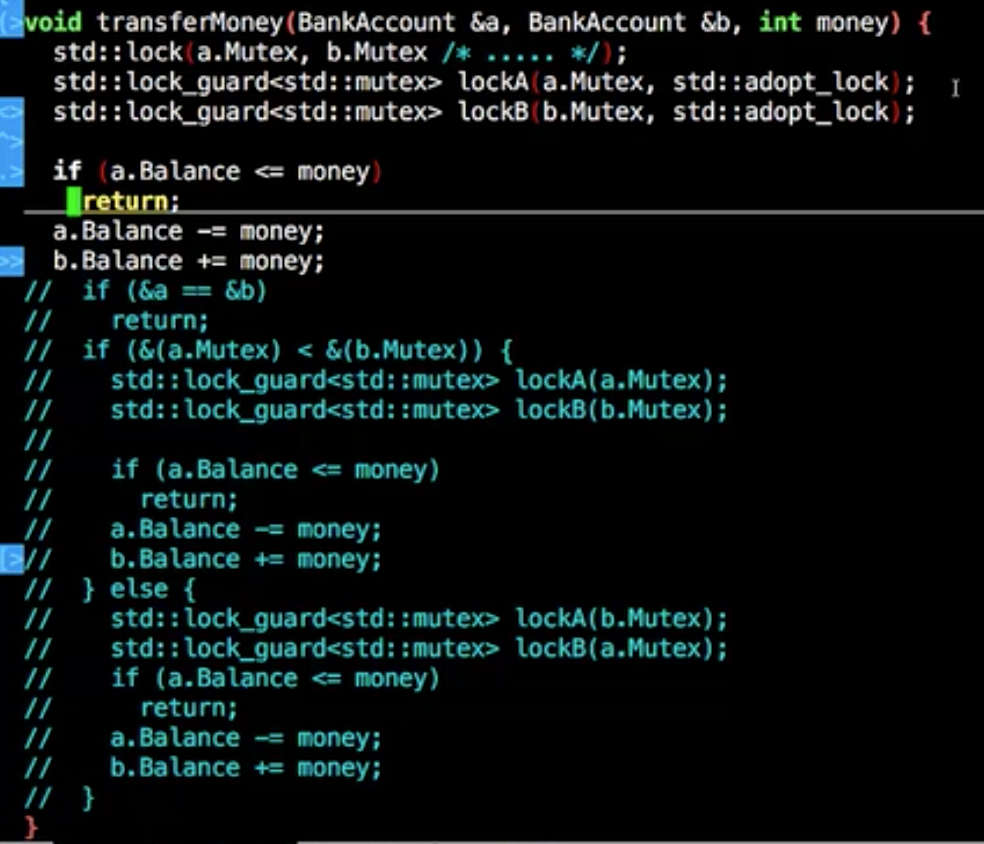
1 2 3 4 5 6 7 8 9 10 11 12 13 14 15 16 17 18 19 20 21 22 23 24 25 26 27 #include <mutex> struct BankAccount { BankAccount(int b):Balance(b) {} int Balance; std ::mutex Mutex; }; void transferMoney (BankAccount& a, BankAccount& b, int money) std ::lock_guard<std ::mutex> lockA(a.Mutex); std ::lock_guard<std ::mutex> lockB(b.Mutex); if (a.Balance <= money) return ; a.Balance -= money; b.Balance += money; }
这样比较地址小的锁去锁住,大家锁相同的就行了
这样标准库也有简易写法如下
std::lock保证按某种特定顺序锁定去锁
std::lock只负责锁,所以要用std::lock_guard去解锁
要让std::lock_guard只负责锁,就得传入std::adopt_lock告知已经锁住了
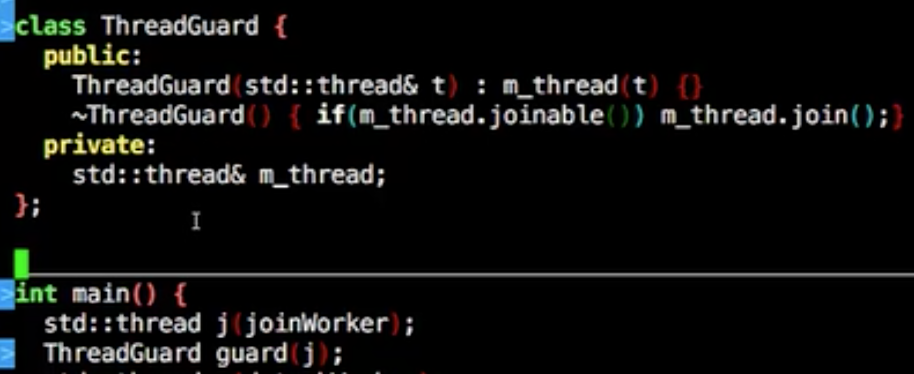
thread交互问题 join/deatch 在main函数如果没有进行thread的join,则默认会进行调用abort导致程序进行dumped
而且会让main函数栈的对象资源无法正常进行析构
对于生成thread的两种做法
1 2 3 4 5 6 7 8 9 10 11 12 13 14 15 16 17 18 19 20 21 22 23 24 25 26 #include "joinTest.h" #include <iostream> #include <thread> class Obj {public : Obj(){std ::cout << "hello " ;} ~Obj(){std ::cout << "world\n" ;} }; void joinWorker () } void detachWorker () } int main () Obj obj; std ::thread j (joinWorker) ; if (j.joinable()){ j.join(); } return 0 ; }
1 2 3 4 5 6 7 8 9 10 11 12 13 class Obj {public : Obj(){std ::cout << "hello " ;} ~Obj(){std ::cout << "world\n" ;} }; void detachWorker () Obj obj; } std ::thread w (detachWorker) ;w.detach();
做一个事情,然后并不需要想管理这个线程,调用detach,如果detach的线程比主线程的生命周期长,主线程结束会直接杀掉detach
1 2 3 4 5 6 7 8 void detachWorker () std ::this_thread::sleep_for(std ::chrono::seconds(10 )); Obj obj; } std ::thread w (detachWorker) ;w.detach();
所以一般都自己做管理
在析构做join
信号 1 2 3 4 5 6 7 8 9 10 11 12 13 14 15 16 17 18 19 20 21 22 23 24 25 26 27 28 29 30 31 32 33 34 35 36 37 38 39 #include <thread> #include <mutex> #include <atomic> #include <vector> #include <iostream> std ::mutex mutex;std ::atomic<bool > ready{false }; void worker (int i) while (!ready){ } std ::cout << "hello world " << i << "\n" ; } int main () const auto threadCount = 4 ; std ::vector <std ::thread> pool; for (int i = 0 ; i < threadCount; ++i) { pool.emplace_back(worker, i); } ready = true ; for (auto &v: pool){ if (v.joinable()) v.join(); } std ::cout << "bye bye\n" ; }
跑下来 iostream的输出流是乱序的
1 2 3 4 5 6 7 8 void worker (int i) mutex.lock(); while (!ready){ } std ::cout << "hello world " << i << "\n" ; mutex.unlock(); }
这样就有序了
当然使用printf也可以做到有序输出
1 2 3 4 5 6 7 8 std ::cout << "hello world " << i << "\n" ;
但是这种while的判断是个活锁
这样的情况再好的机器,也是浪费cpu的资源
yield 1 2 3 4 5 6 while (!ready){ std ::this_thread::yield(); }
能否过段时间检查一下过段时间检查一下?
1 2 3 while (!ready){ std ::this_thread::sleep_for(std ::chrono::seconds(1 )); }
那就让每个线程都睡眠一下
消息 单线程版本
1 2 3 4 5 6 7 8 9 10 11 12 13 14 15 16 17 18 19 20 21 22 23 24 25 26 27 28 29 30 31 32 33 34 35 36 37 38 39 40 41 42 43 44 #include <string> #include <list> #include <thread> #include <chrono> #include <iostream> class Message {public : Message(std ::string d):m_data(std ::move(d)){ } const std ::string & data () return m_data;}; private : std ::string m_data; }; std ::list <Message> globalList;void worker () while (!globalList.empty()){ auto iter = globalList.begin(); globalList.erase(iter); } } int main () for (int i = 0 ; i < 1000 ; ++i) { globalList.push_back("this is a test" + std ::to_string(i)); } worker(); for (int i = 0 ; i < 1000 ; ++i) { std ::this_thread::sleep_for(std ::chrono::microseconds(30 )); globalList.push_back(std ::string ("second" )); } std ::cout << "before size:" << globalList.size() <<std ::endl ; worker(); std ::cout << "after size:" << globalList.size() <<std ::endl ; }
多线程版本
1 2 3 4 5 6 7 8 9 10 11 12 13 14 15 16 17 18 19 20 21 22 23 24 25 26 27 28 29 30 31 32 33 34 35 36 37 38 39 40 41 42 43 44 45 46 47 48 49 50 51 52 53 54 55 56 57 58 59 60 61 62 63 64 65 66 67 68 69 70 #include <string> #include <list> #include <thread> #include <chrono> #include <iostream> #include <vector> class Message {public : Message(std ::string d):m_data(std ::move(d)){ } const std ::string & data () return m_data;}; private : std ::string m_data; }; std ::mutex mutex;std ::atomic<bool > ready{false };std ::atomic<bool > quit{false };std ::list <Message> globalList;void worker (int i) while (!ready){ } while (!quit){ std ::lock_guard<std ::mutex> lock(mutex); if (globalList.empty()) continue ; auto iter = globalList.begin(); globalList.erase(iter); } } int main () const auto threadCount = 4 ; for (int i = 0 ; i < 1000 ; ++i) { globalList.push_back("this is a test" + std ::to_string(i)); } std ::vector <std ::thread> pool; for (int i = 0 ; i < threadCount; ++i) { pool.emplace_back(std ::thread(worker, i)); } std ::cout << "before size:" << globalList.size() <<std ::endl ; ready = true ; for (int i = 0 ; i < 1000 ; ++i) { std ::lock_guard<std ::mutex> lock(mutex); std ::this_thread::sleep_for(std ::chrono::microseconds(30 )); globalList.push_back(std ::string ("second" )); } while (true ){ std ::lock_guard<std ::mutex> lock(mutex); if (globalList.empty()){ quit = true ; break ; } } for (auto &v : pool) { if (v.joinable()) v.join(); } std ::cout << "after size:" << globalList.size() <<std ::endl ; }
condition_variable std::unique_lock<std::mutex> lock(mutex);std::lock_guard
区别在于unique_lock搭配cv来
cv.wait(lock, []{ return quit || !globalList.empty();});
示例代码
1 2 3 4 5 6 7 8 9 10 11 12 13 14 15 16 17 18 19 20 21 22 23 24 25 26 27 28 29 30 31 32 33 34 35 36 37 38 39 40 41 42 43 44 45 46 47 48 49 50 51 52 53 54 55 56 57 58 59 60 61 62 63 64 65 66 67 68 69 70 71 72 73 74 75 76 77 78 #include <string> #include <atomic> #include <vector> #include <mutex> #include <condition_variable> #include <list> #include <cstring> #include <thread> class Message {public : const std ::string & data () const return m_data;} Message(std ::string d = std ::string ()):m_data(std ::move(d)){} private : std ::string m_data; }; std ::atomic<int > totalSize(0 );std ::mutex mutex;std ::condition_variable cv;std ::atomic<bool > ready{false };bool quit{false };std ::list <Message> globalList;void worker (int i) while (!ready){ } Message msg; while (!quit){ { std ::unique_lock<std ::mutex> lock(mutex); cv.wait(lock, []{ return quit || !globalList.empty();}); if (quit) return ; auto iter = globalList.begin(); msg = std ::move(*iter); globalList.erase(iter); } totalSize += strlen (msg.data().c_str()); } } int main () const auto threadCount = 4 ; for (int i = 0 ; i < 50000 ; ++i) { globalList.push_back("this is a tst" + std ::to_string(i)); } std ::vector <std ::thread> pool; for (int k = 0 ; k < threadCount; ++k) { pool.emplace_back(std ::thread(worker, k)); } ready = true ; for (int j = 0 ; j < 2000 ; ++j) { std ::lock_guard<std ::mutex> lock(mutex); globalList.push_back(std ::string ("second" )); cv.notify_one(); } while (true ){ std ::lock_guard<std ::mutex> lock(mutex); if (globalList.empty()){ quit = true ; cv.notify_all(); break ; } } }
cv.wait();直接这样写也可以,等唤醒后就往下执行了

国内查看评论需要代理~