分析
优点
探针技术,无需开发任何介入,只需告知SpringCloud服务模块名称,即可在部署的时候加入链路追踪
探针插件系统强大,基本符合开发常用的所有技术栈链路监控,也可自定义相关的链路追踪业务插件
探针性能从网络Jemeter测试,skywalking的探针对吞吐量的影响最小,zipkin的吞吐量居中,pinpoint的探针对吞吐量的影响较为明显
所有错误(超时.异常)全都会以log event记录在案,并以
Alarm界面展现collector服务端代码模块很好,强大的Module/Provider结构模块自定义扩展
collector后端数据流采用了Streaming,类似简约Storm结构处理
支持业务工具toolkit,自己标注tag
1
2
3
4
5
6
7//@Trace 注解的方法,会创建一个LocalSpan
("/log")
public String log() {
ActiveSpan.tag("mp", "test");
System.out.println("traceId:" + TraceContext.traceId());
return "log";
}
缺点
部署的时候,Host问题
WebUI trace排序缺少倒叙正序
WebUI log只有官方定义Exception,日志查询需要后期与通过traceId关联ELK查询,也可以通过ActiveSpan.tag进行新增tag
异常报警,虽然有界面,但是缺少短信和邮件相关功能支持
由于该技术用了JavaAgent,探针技术所以先传阐述一下探针技术
JavaAgent
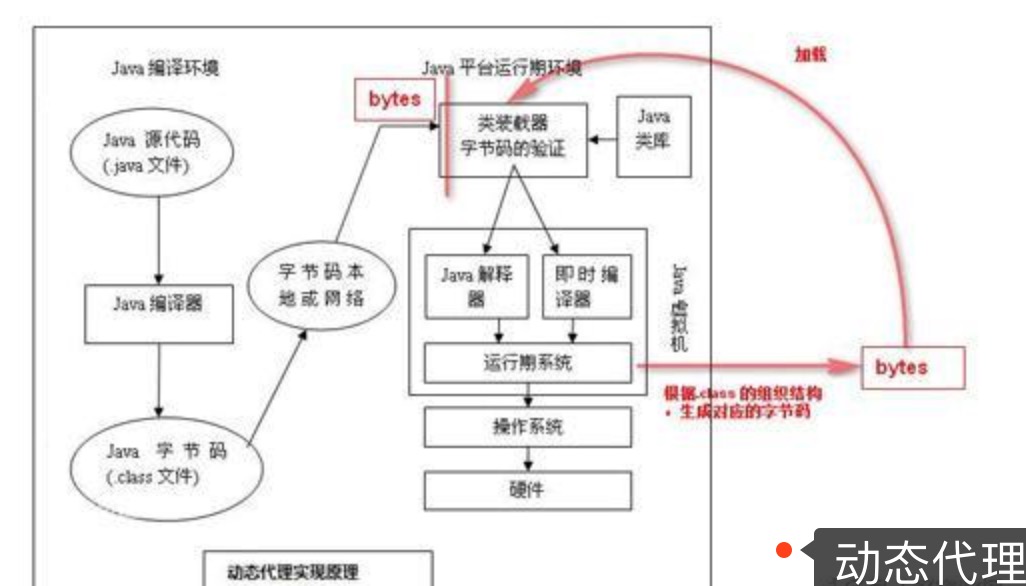
jdk1.5以后引入了javaAgent技术,javaAgent是运行方法之前的拦截器。
我们利用javaAgent和ASM字节码技术,在JVM加载class二进制文件的时候.
利用ASM动态的修改加载的class文件,在监控的方法前后添加计时器功能.
用于计算监控方法耗时
PreMain
1 | package agent; |
Transformer
1 | public class MyTransformer implements ClassFileTransformer { |
案例
1 | public class TimeTest { |
Client
客户端起点在于配置初始化org.skywalking.apm.agent.core.conf.SnifferConfigInitializer,Agent 配置初始化器。
配置类有 Config 和 RemoteDownstreamConfig 两种。
- Config 为 Agent 本地配置类,使用 SnifferConfigInitializer 进行初始化。
- RemoteDownstreamConfig 为 Agent 远程配置类,从 Collector Server 读取。
1 | SnifferConfigInitializer#initialize |
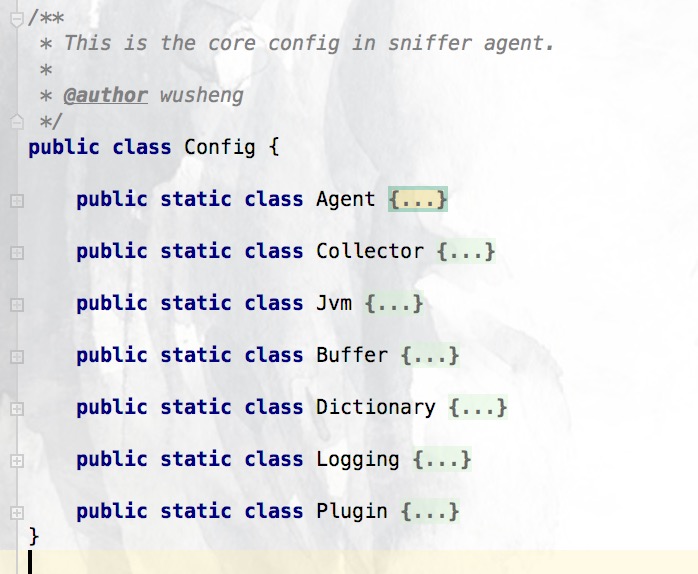
Config
Agent 本地配置类
此类内部主要有Agent / Collector / Jvm / Buffer / Dictionary / Logging / Plugin 七个小类
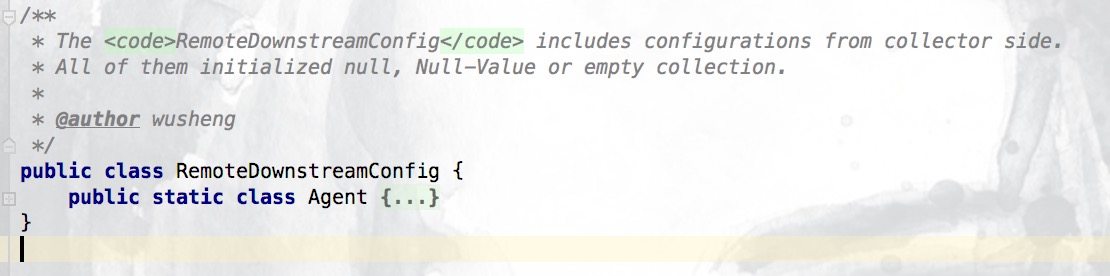
RemoteDownstreamConfig
Agent 远程配置类。
只有Agent小类
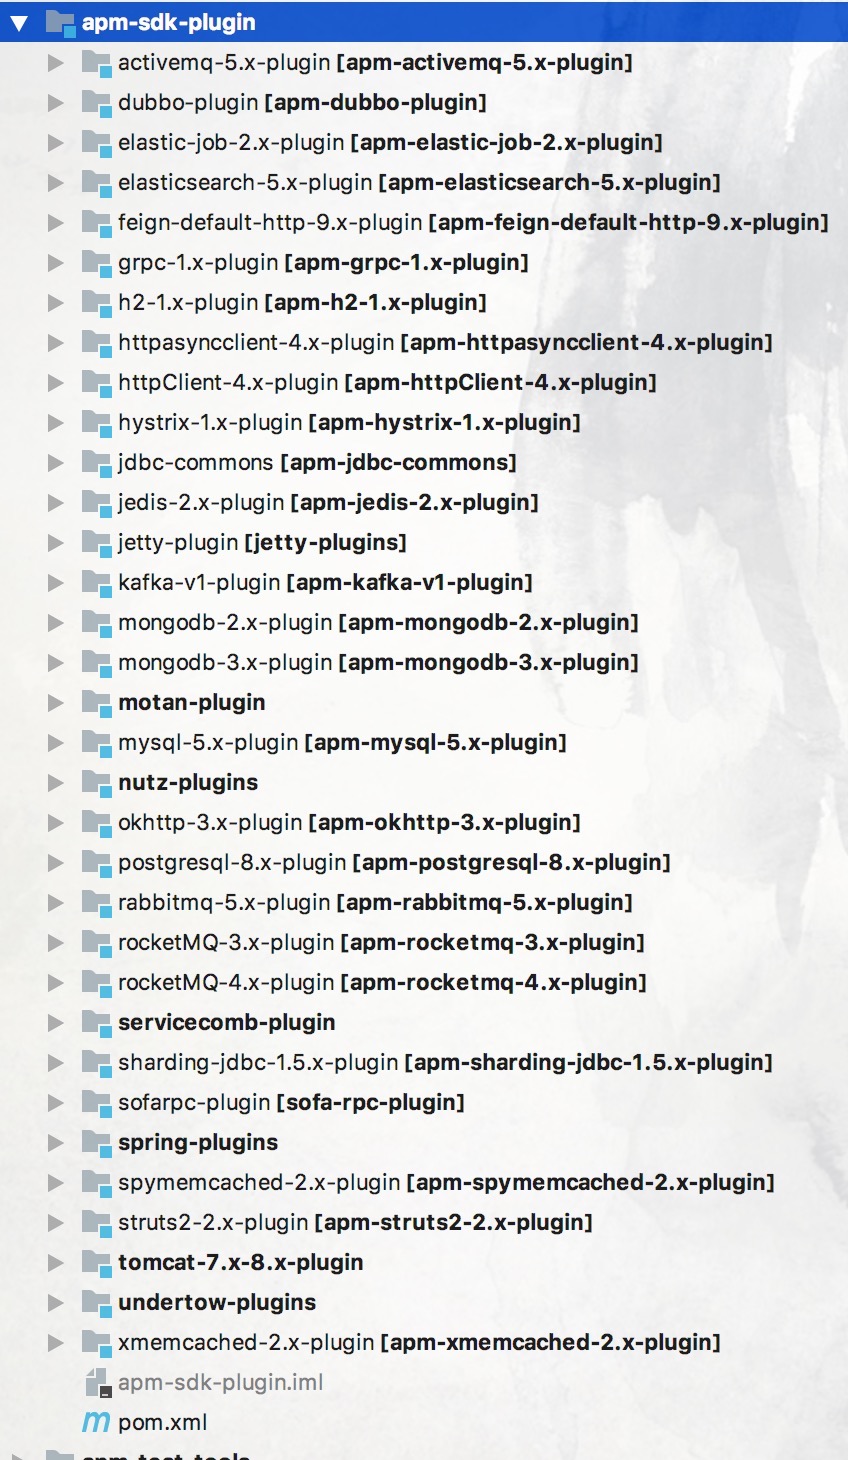
Plugin
SkyWalking Agent 提供了多种插件,实现不同框架的透明接入SkyWalking。
apm-sniffer/apm-sdk-plugin目录下,有插件的实现代码
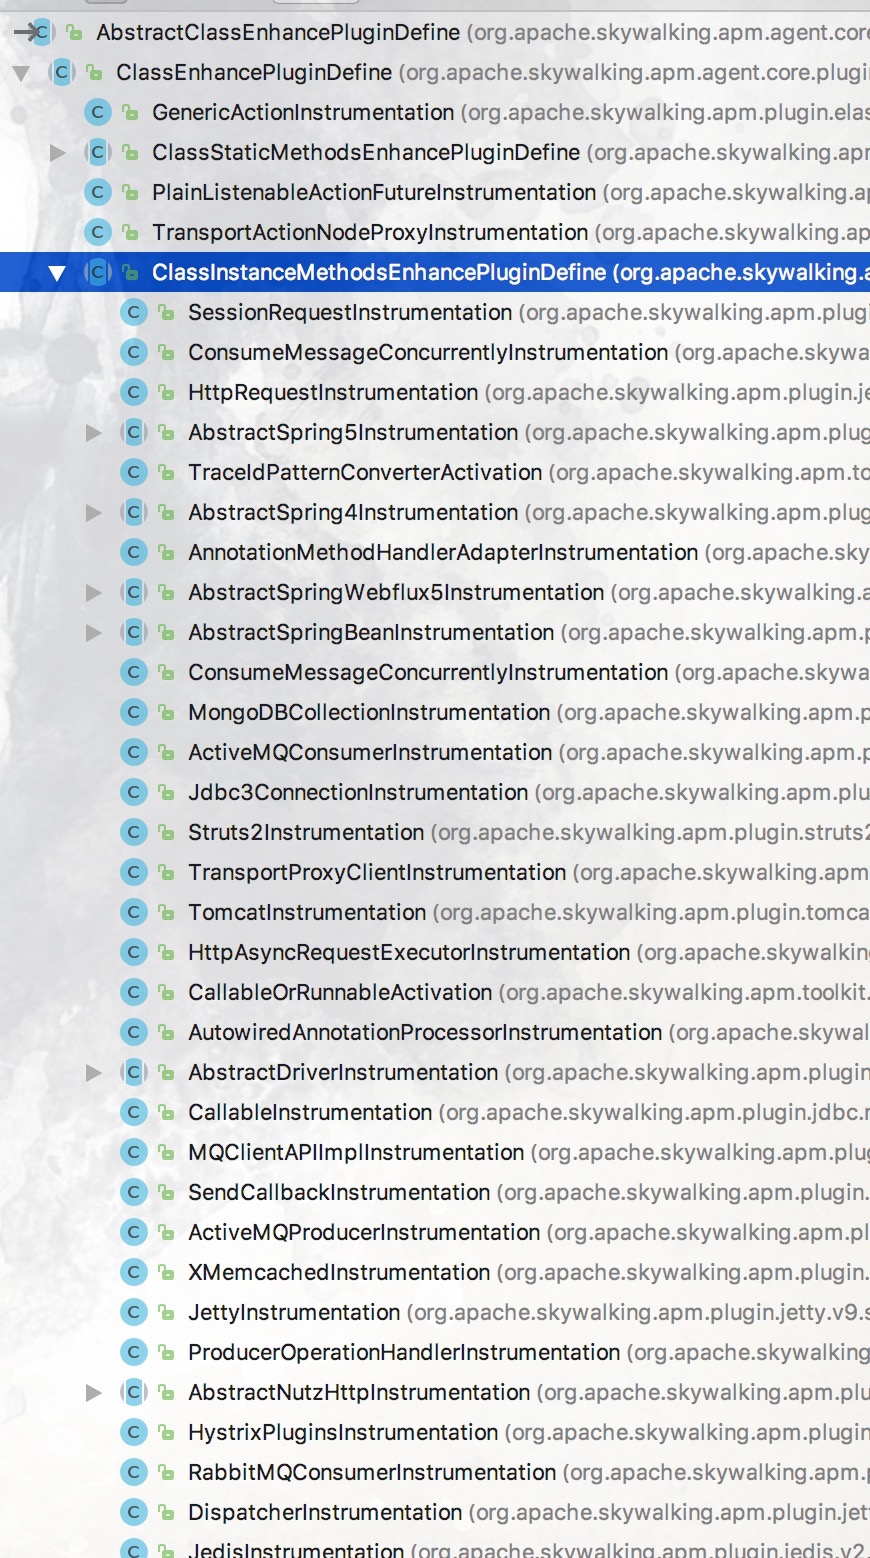
PluginBootstrap
插件引导程序类,创建需要加载的插件对象数组。
org.skywalking.apm.agent.core.plugin.PluginBootstrap
通过loadPlugins()作如下事项
- 初始化
AgentClassLoader - 获得插件定义路径数组
- 获得插件定义
PluginDefine 创建类增强插件定义
AbstractClassEnhancePluginDefine,并提供define形成builder1
不同插件定义不同的切面,记录调用链路
PluginFinder
插件发现者
提供find(typeDescription)查找相关的类增强插件AbstractClassEnhancePluginDefine
find()查找AbstractClassEnhancePluginDefine对象- 处理
NameMatch为匹配的AbstractClassEnhancePluginDefine对象,添加到nameMatchDefine属性。 - 处理非
NameMatch为匹配的AbstractClassEnhancePluginDefine对象,添加到signatureMatchDefine属性。
- 处理
ServiceManager
BootService管理器,负责管理和初始化BootService实例们org.skywalking.apm.agent.core.boot.ServiceManager
loadAllServices()方法,加载所有BootService实例类的实例数组
ServiceManager 基于SPI (Service Provider Interface)机制
在/resources/META-INF.services/org.skywalking.apm.agent.core.boot.BootService文件里
定义了所有BootService的实现类。beforeBoot()调用每个BootService#beforeBoot()方法startup(),调用每个BootService#boot()方法afterBoot()调用每个BootService#afterBoot()方法
BootService
1 | org.apache.skywalking.apm.agent.core.remote.TraceSegmentServiceClient |
定义以上七个,分别有beforeBoot() / boot() / afterBoot() / shutdown() 接口方法。
Plugin
插件的加载
Agent 初始化时,调用PluginBootstrap#loadPlugins()方法,加载所有的插件。
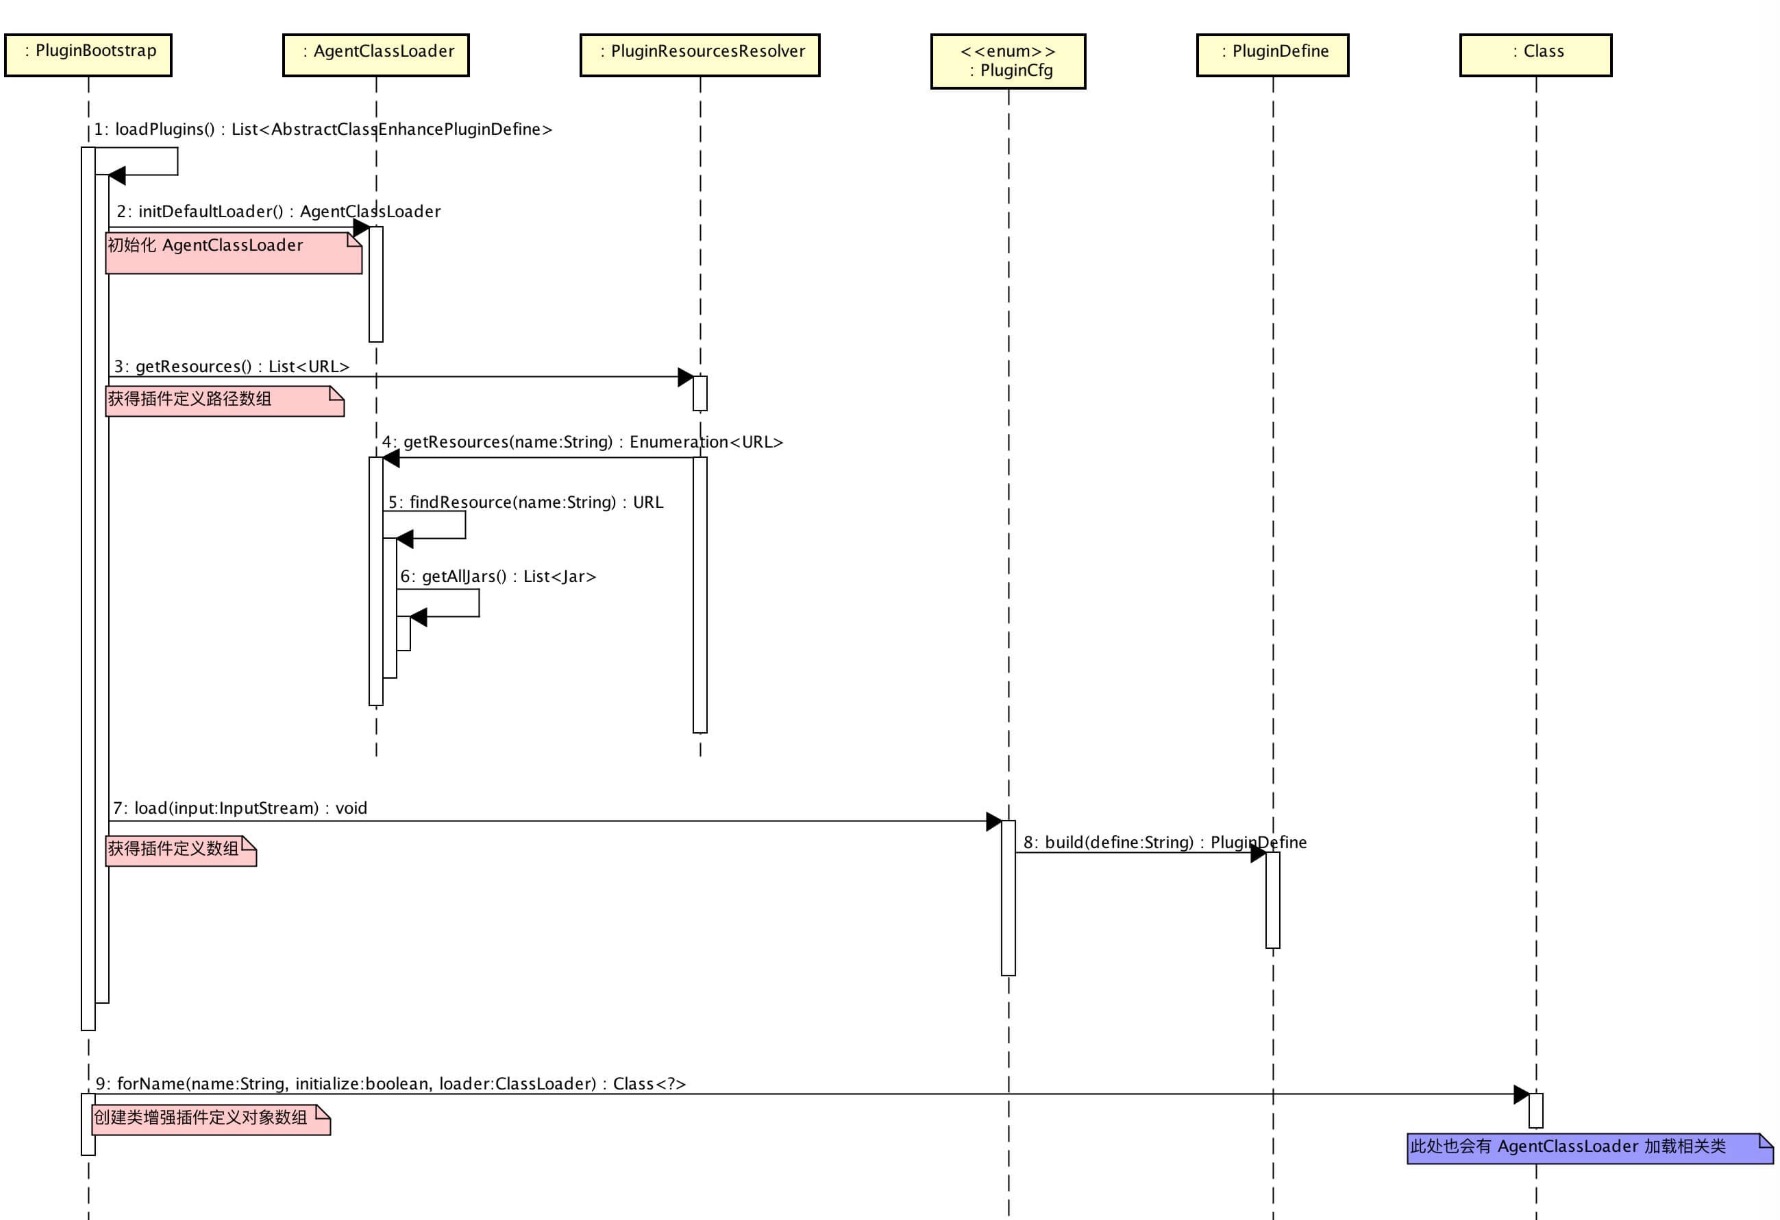
AgentClassLoader
应用透明SkyWalking,不会显式导入SkyWalking依赖,所以自定义ClassLoader
1 | public static AgentClassLoader initDefaultLoader() throws AgentPackageNotFoundException { |
在 ClassLoader 加载资源(例如,类),会调用如下
- #findResource(name)
- #findResources(name)
PluginResourcesResolver
插件资源解析器,读取所有插件(/resource/skywalking-plugin.def)定义文件

#getResources()方法,获得插件定义路径数组
使用了AgentClassLoader获得所有skywalking-plugin.def的路径。
PluginCfg
插件定义配置,读取玩skywalking-plugin.def
生成插件定义(org.skywalking.apm.agent.core.plugin.PluginDefinie)数组。
AbstractClassEnhancePluginDefine
类增强插件定义抽象基类。
不同插件通过实现AbstractClassEnhancePluginDefine抽象类
定义不同框架的切面记录调用链路
Server
Collector 组件
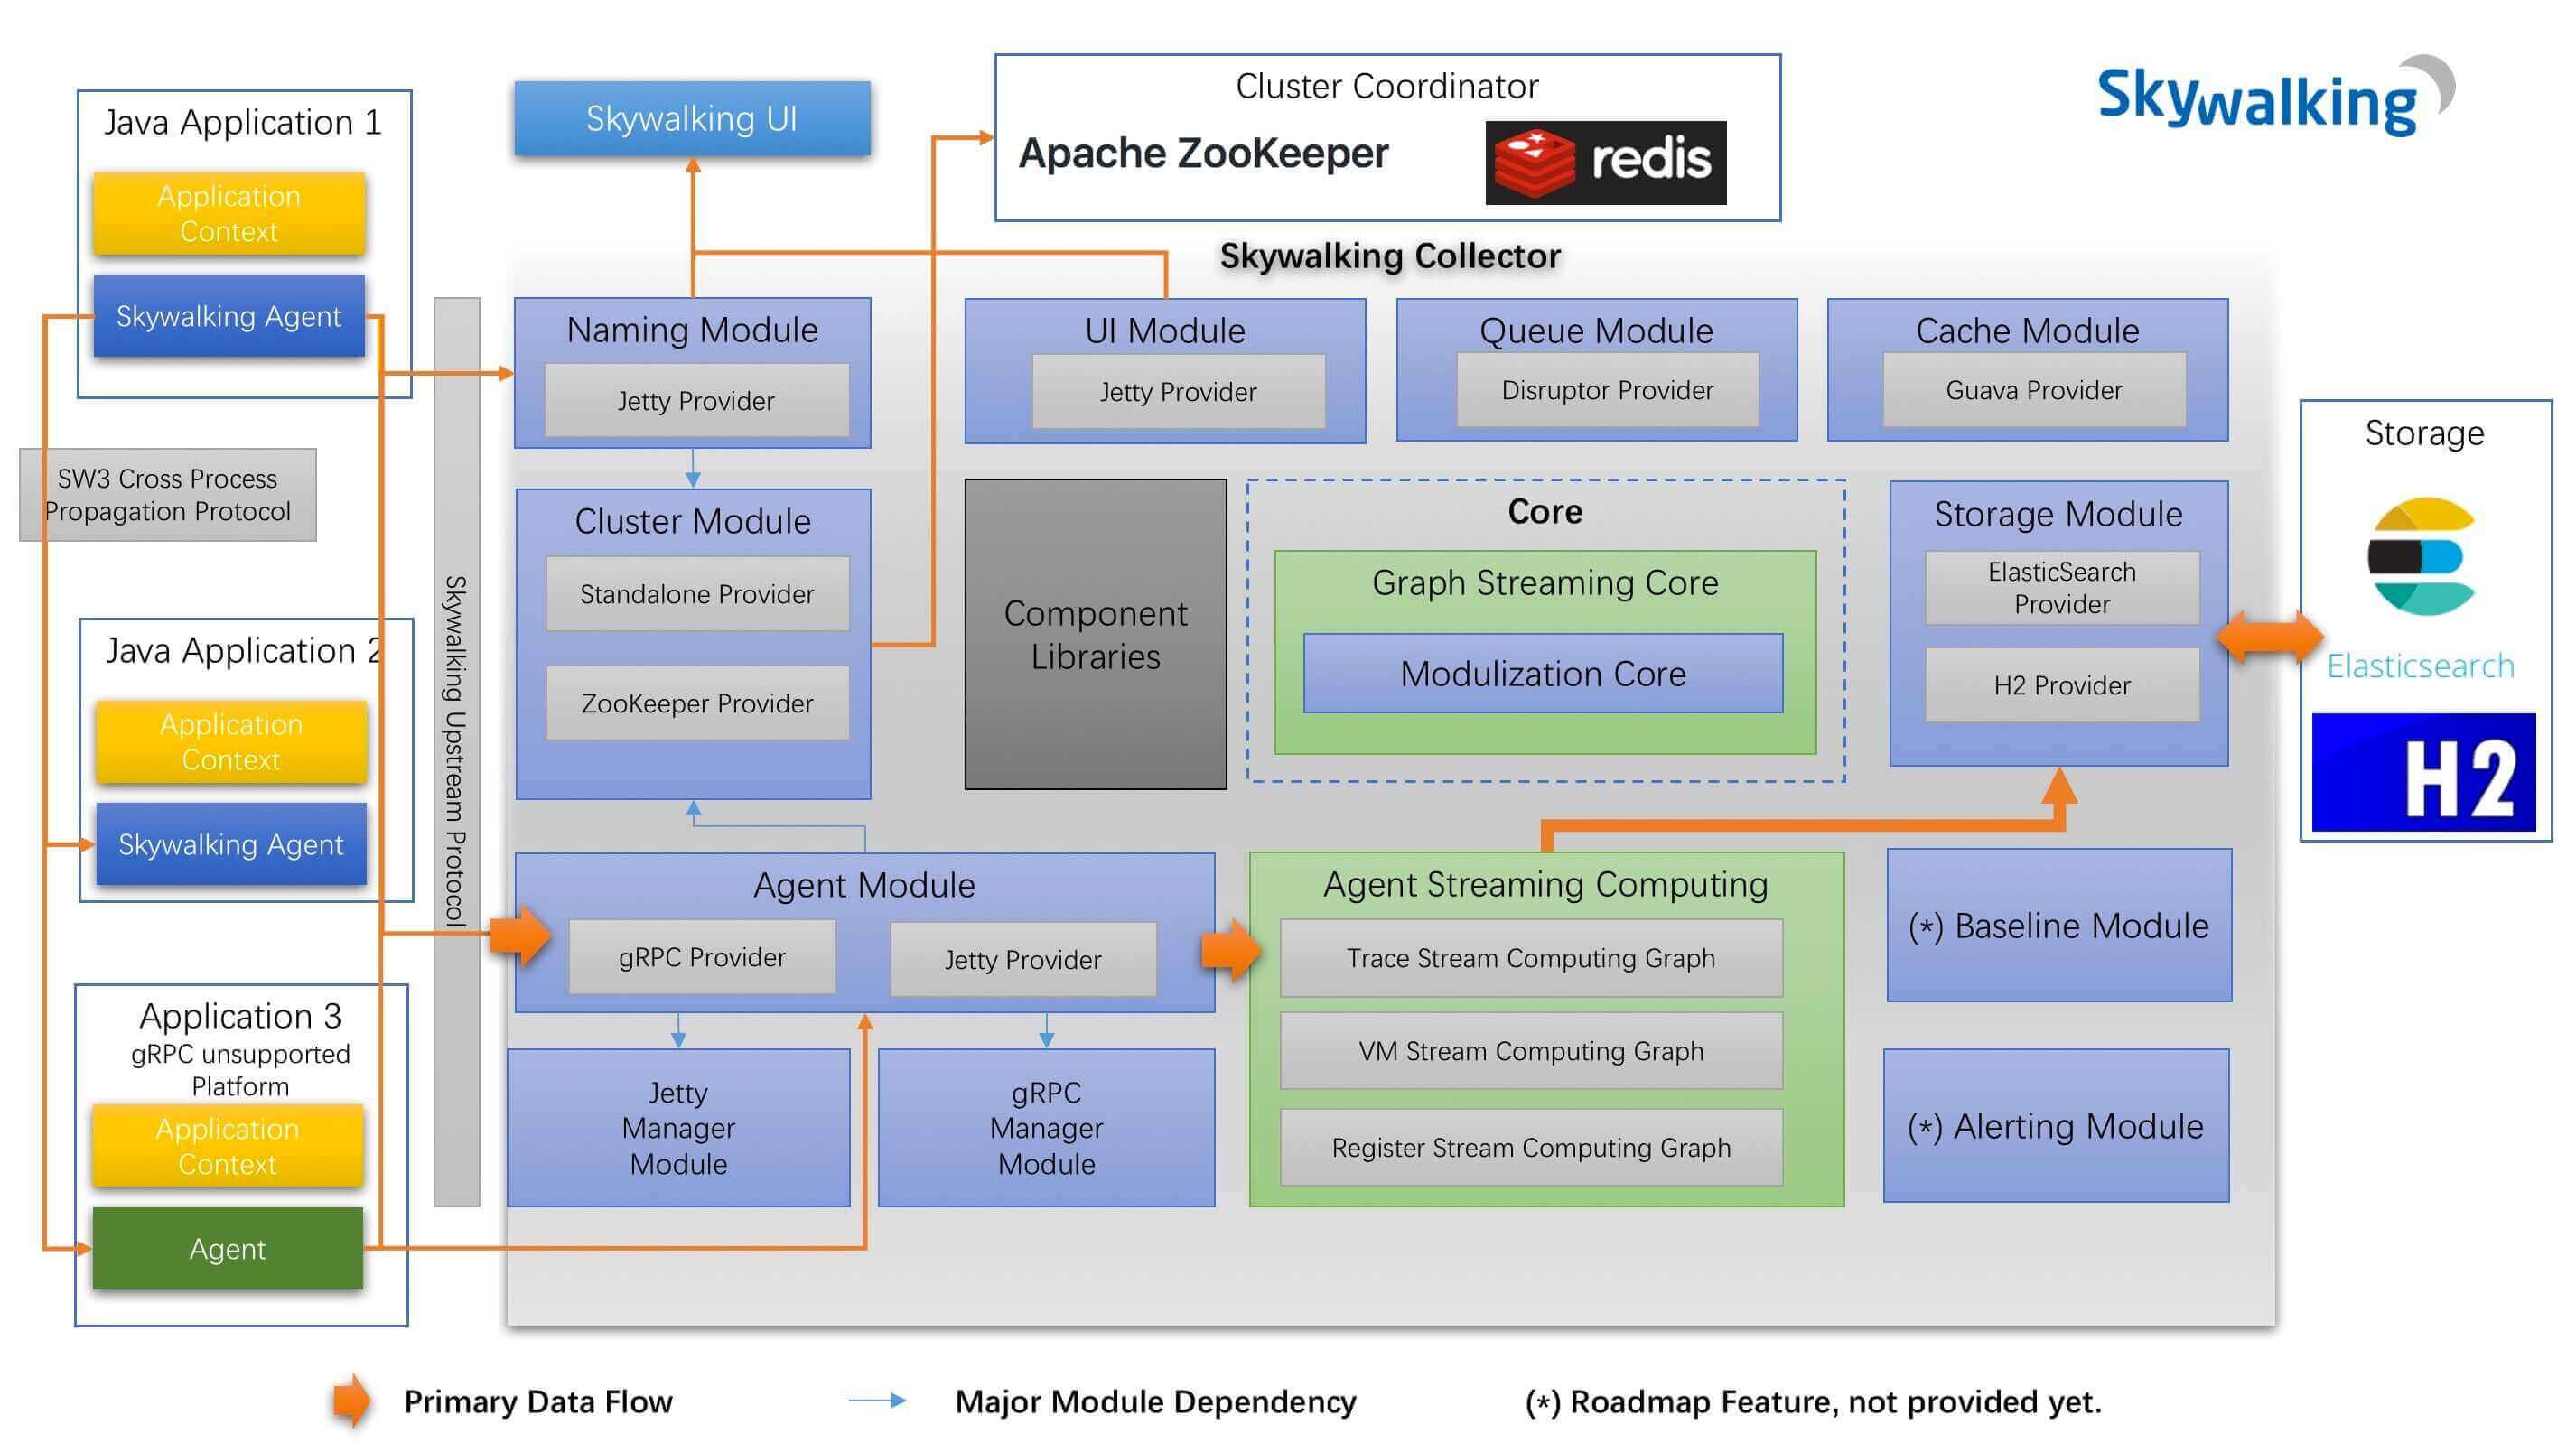
OAPServerStartUp
skyWalking Collector 启动入口
- 调用
ApplicationConfiguration#load()方法,加载Collector配置。 - 调用
ModuleManager#init(...)方法,初始化Collector组件们。
ApplicationConfigLoader
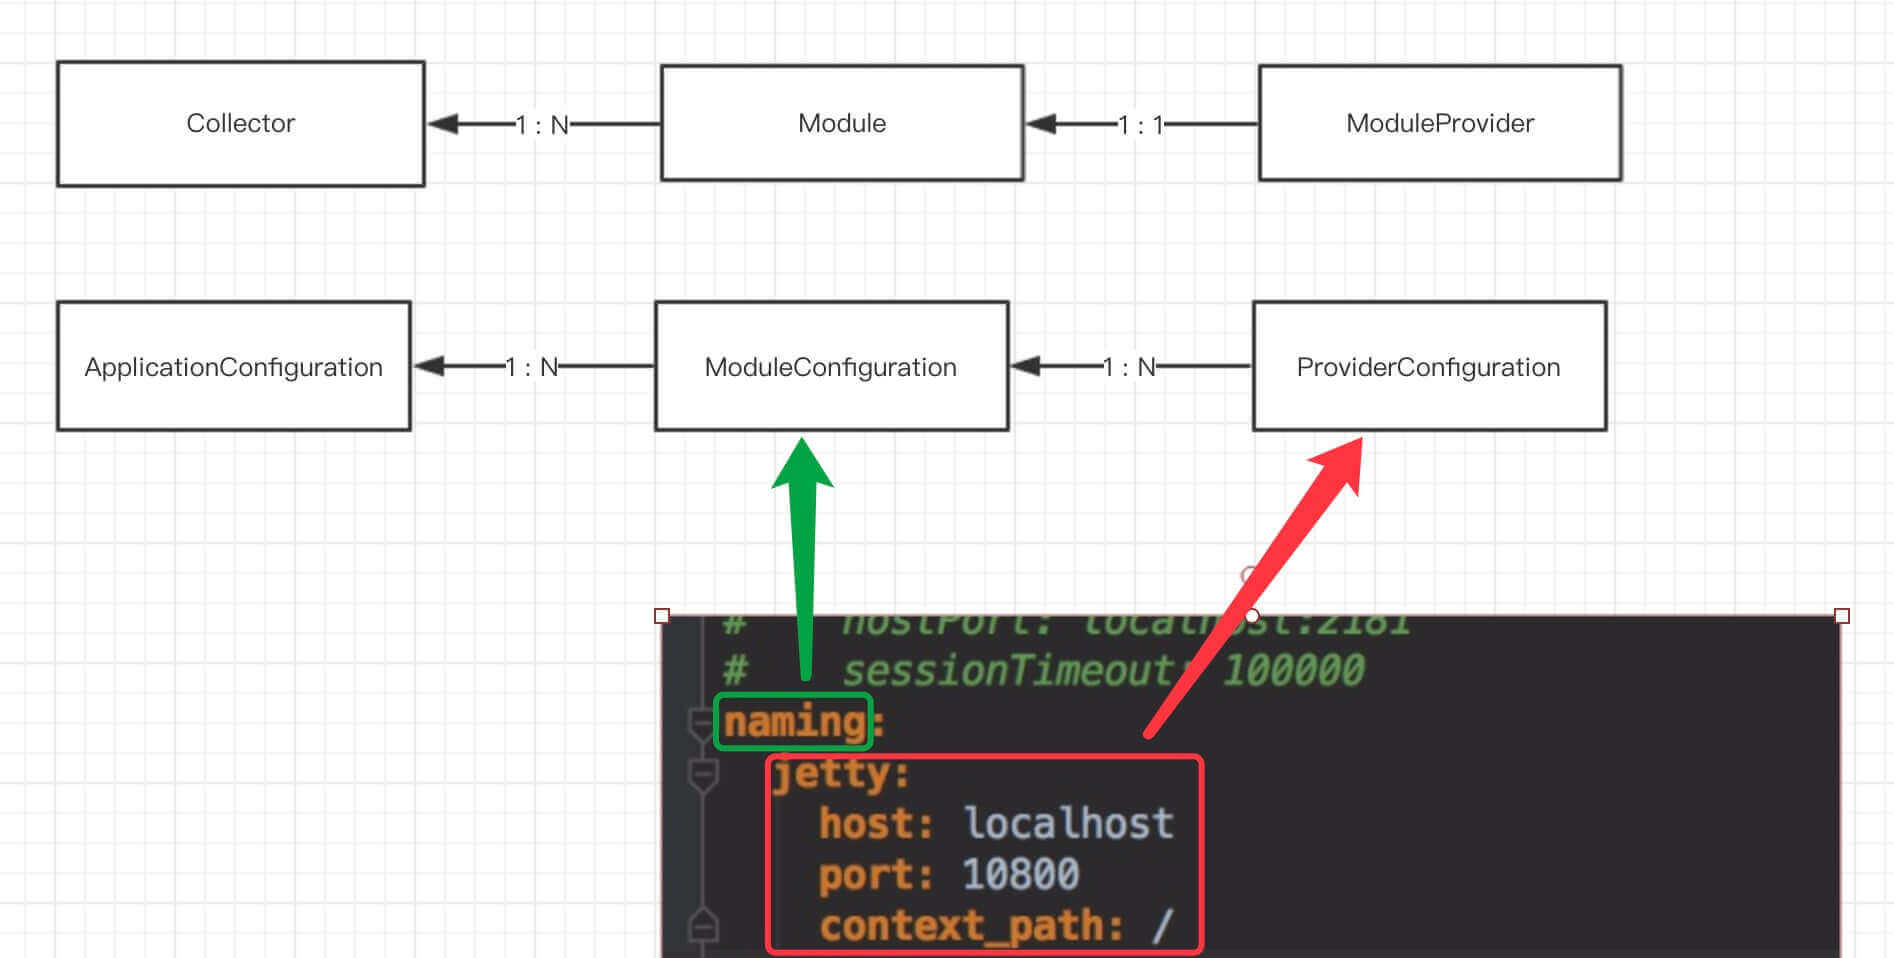
绿框部分,对应一个组件配置类。
红框部分,对应一个组件服务提供者配置类。
理一下关系
1 |
|
调用 #loadConfig() 方法
从 apm-collector-core 的 application.yml 加载自定义配置。
overrideConfigBySystemEnv
从系统环境覆盖配置
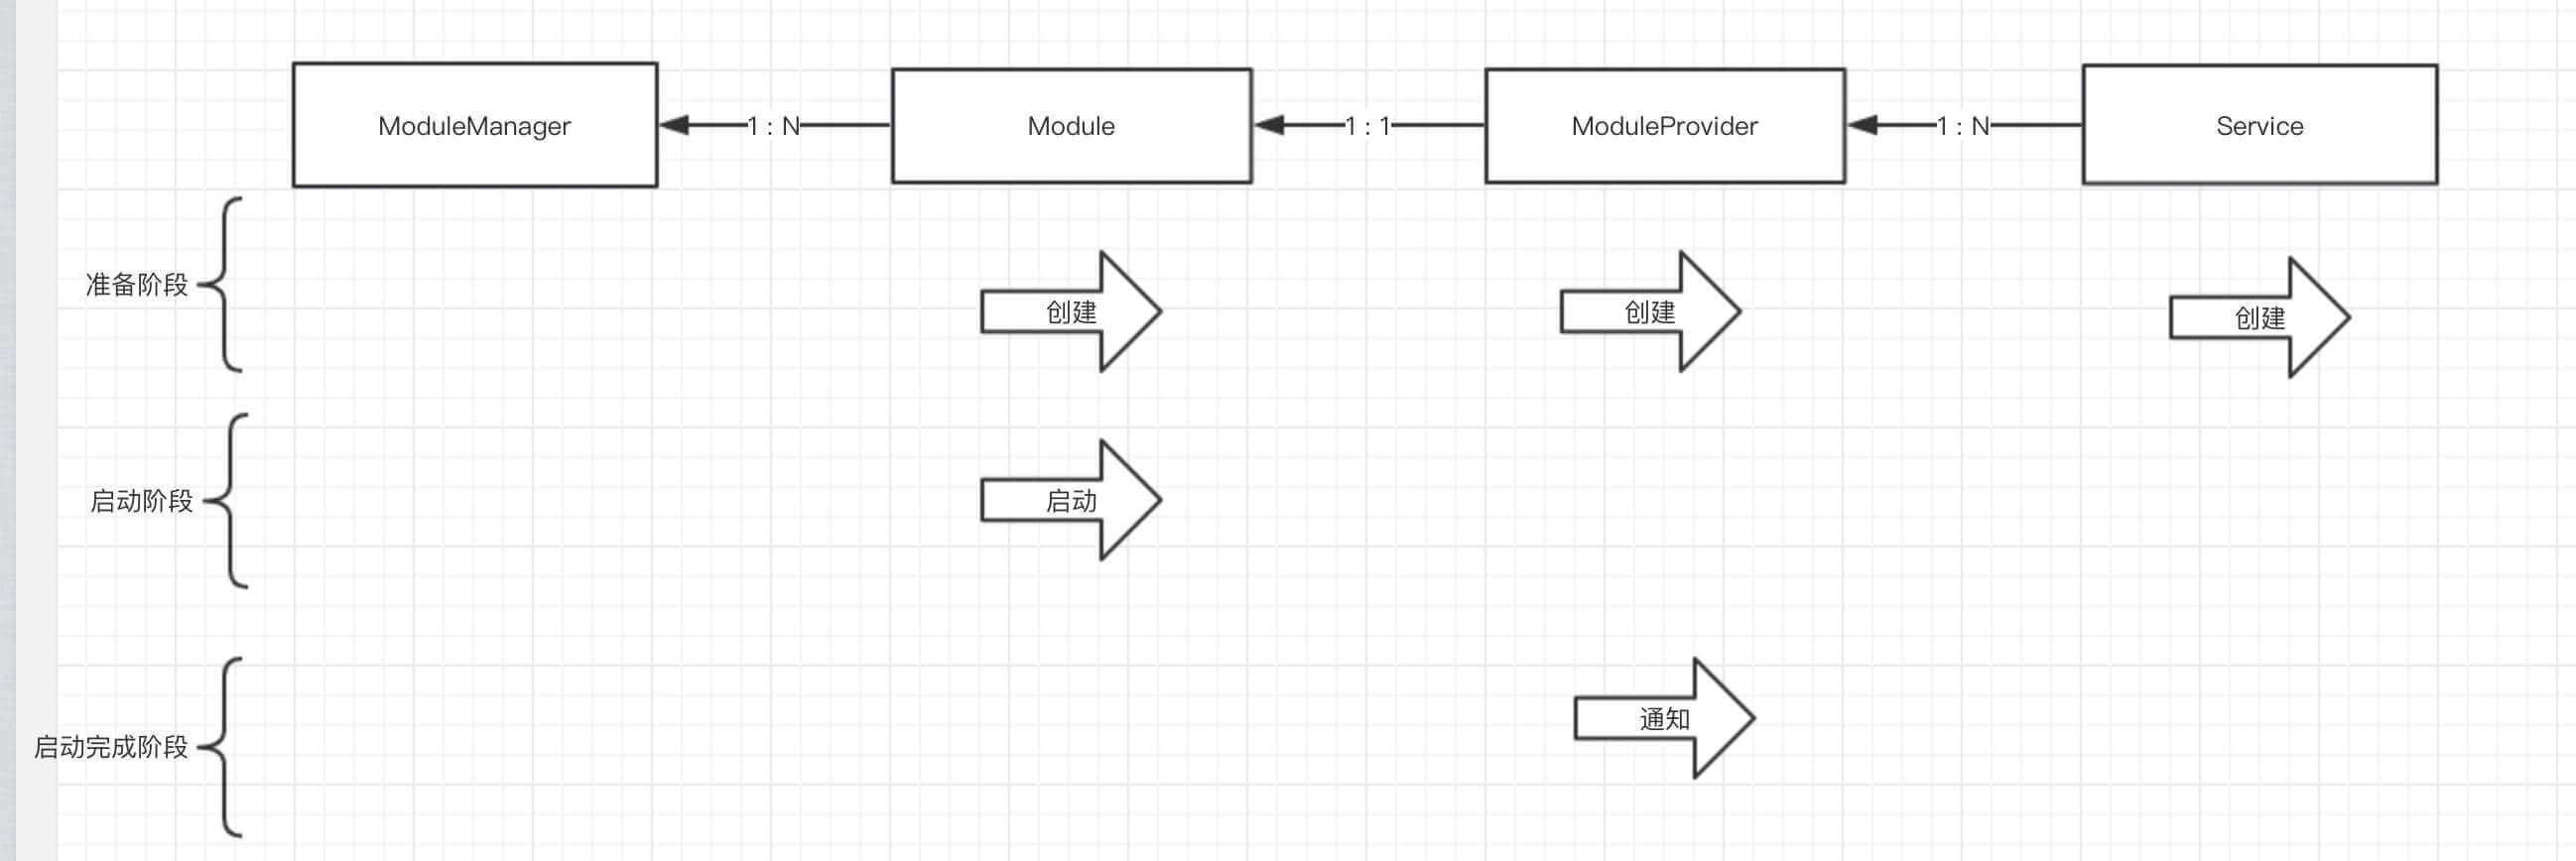
ModuleManager
ModuleManager 组件管理器,负责组件的管理与初始化。
init()初始化组件
ServiceLoader.load(ModuleDefine.class);j加载所有Module实现类数组
ServiceManager 基于SPI (Service Provider Interface)机制
在每个serverPlugin项目的/resources/META-INF.services/org.skywalking.apm.collector.core.module.Module文件里
定义了该项目 Module 的实现类。
遍历Module实现的实例数组,创建配置中的Module实现类的实例
- 创建Module对象
- 调用
prepare(...)方法,执行Module准备阶段的逻辑- 方法内部寻找
ServiceLoader.load(ModuleProvider.class); - 实例化然后ModuleProvider添加到loadedProviders
- 方法内部寻找
BootstrapFlow#start(...)方法,执行Module启动逻辑BootstrapFlow#notifyAfterCompleted()方法,执行Module启动完成,通知ModuleProvider。
Collector处理Trace数据
Collector Streaming 流式处理
graph包的基础上:提供异步、跨节点等等的流式处理的封装
1 | 在 Storm 中,先要设计一个用于实时计算的图状结构,我们称之为拓扑(topology)。 |
- Graph :定义了一个数据在各个 Node 的处理拓扑图。
- WayToNode :提交数据给 Node 的方式。
- Node :节点,包含一个 NodeProcessor 和 一个 Next 。
- NodeProcessor :Node 处理器,处理数据。
- Next :包含 WayToNode 数组,即 Node 提交数据给 Next 的 Node 数组的方式。
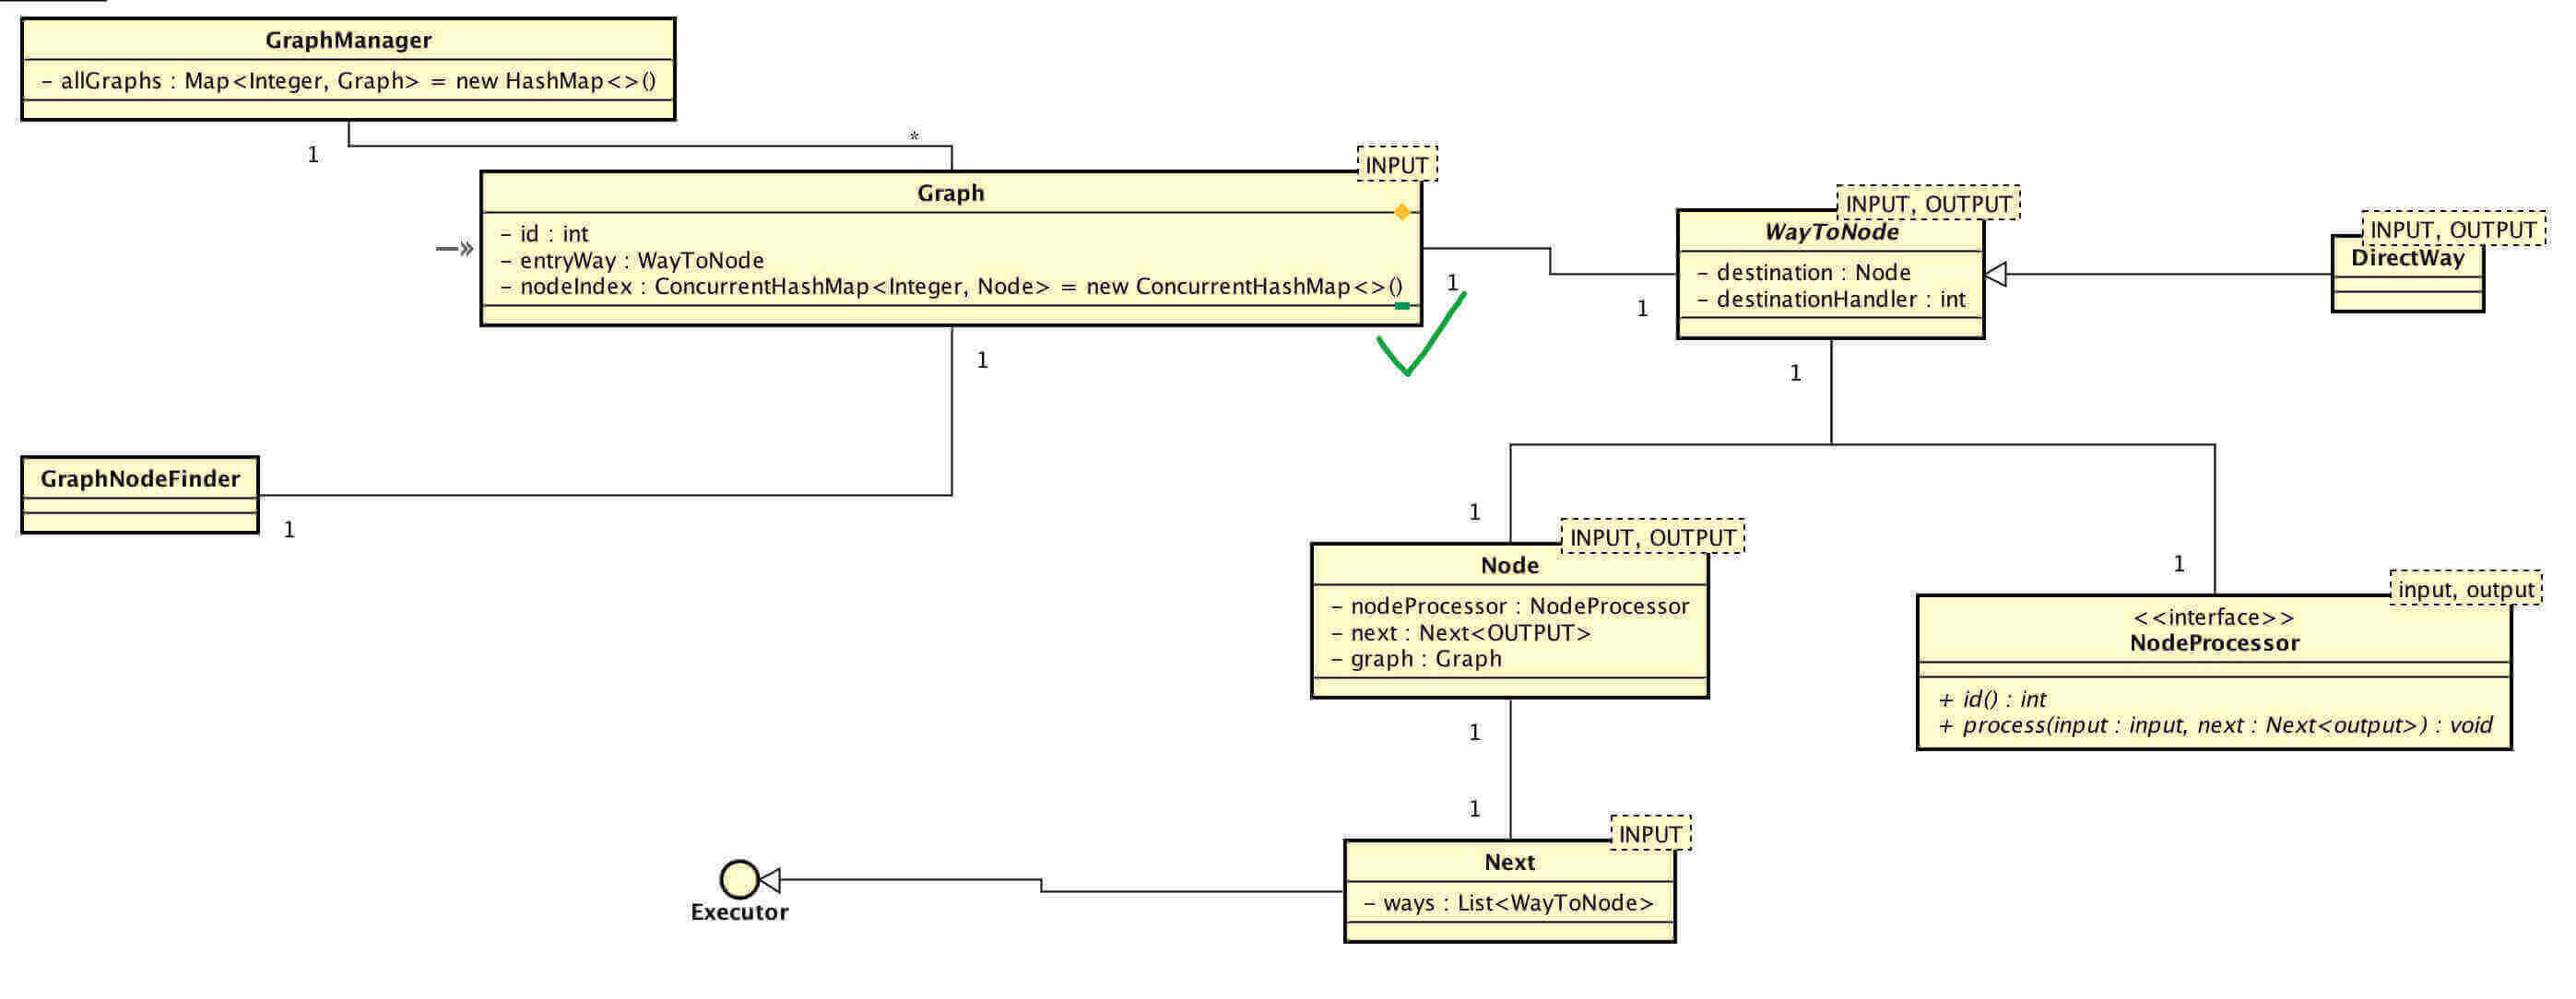
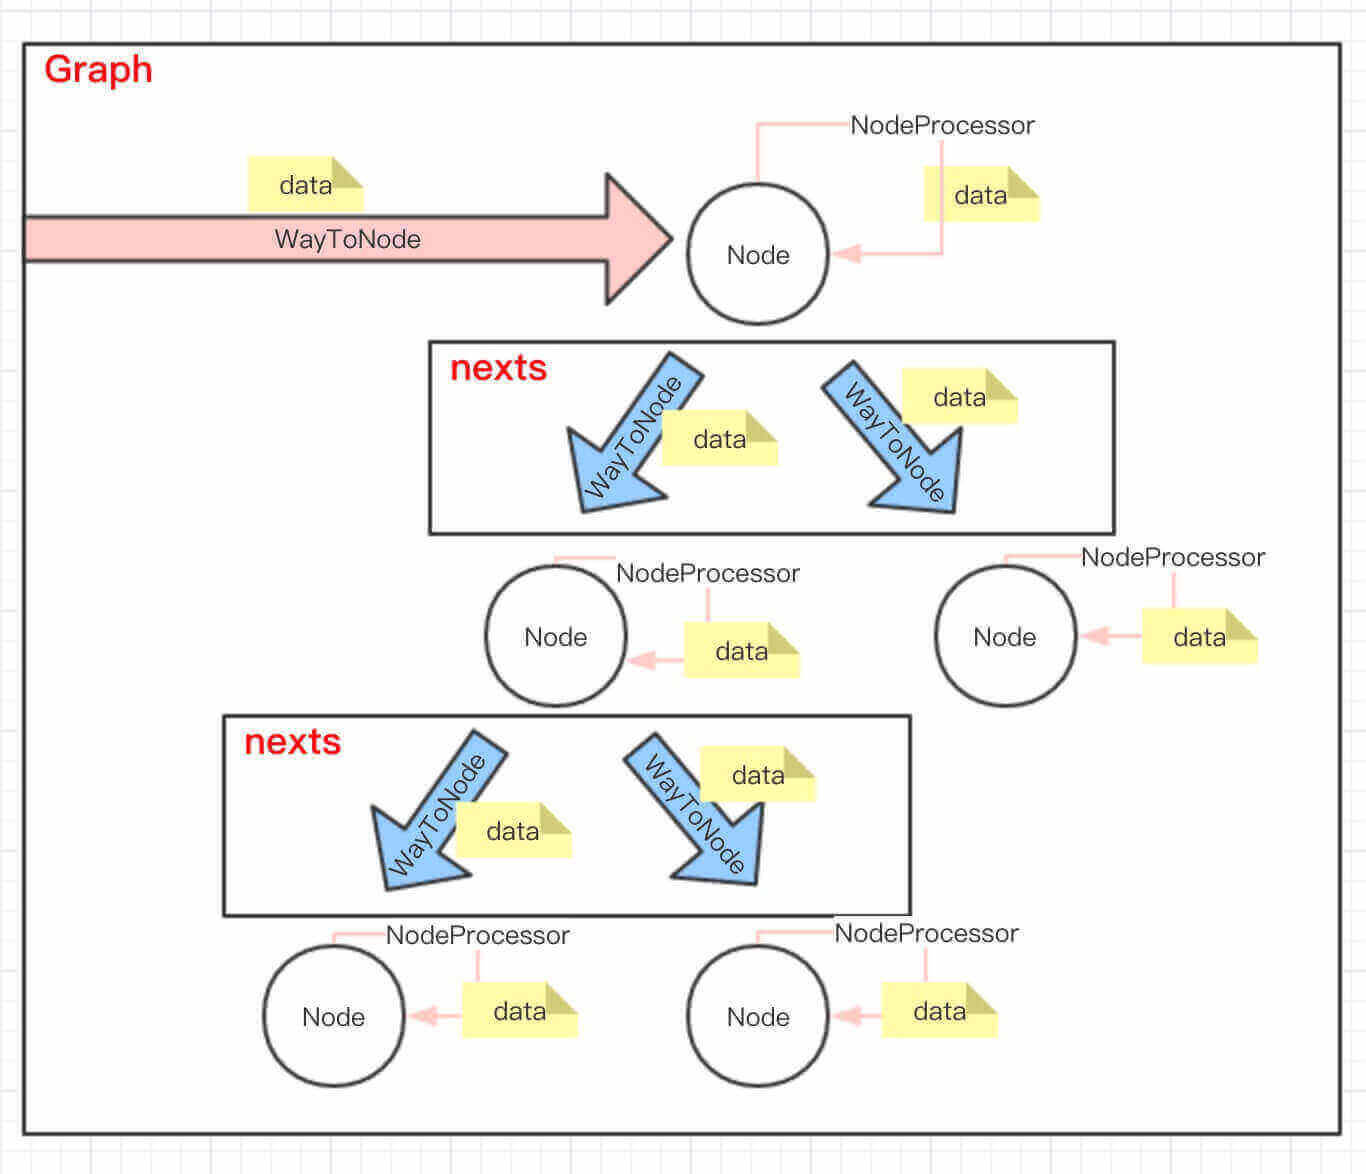
Graph
Graph创建
创建
Graph的顺序图如下
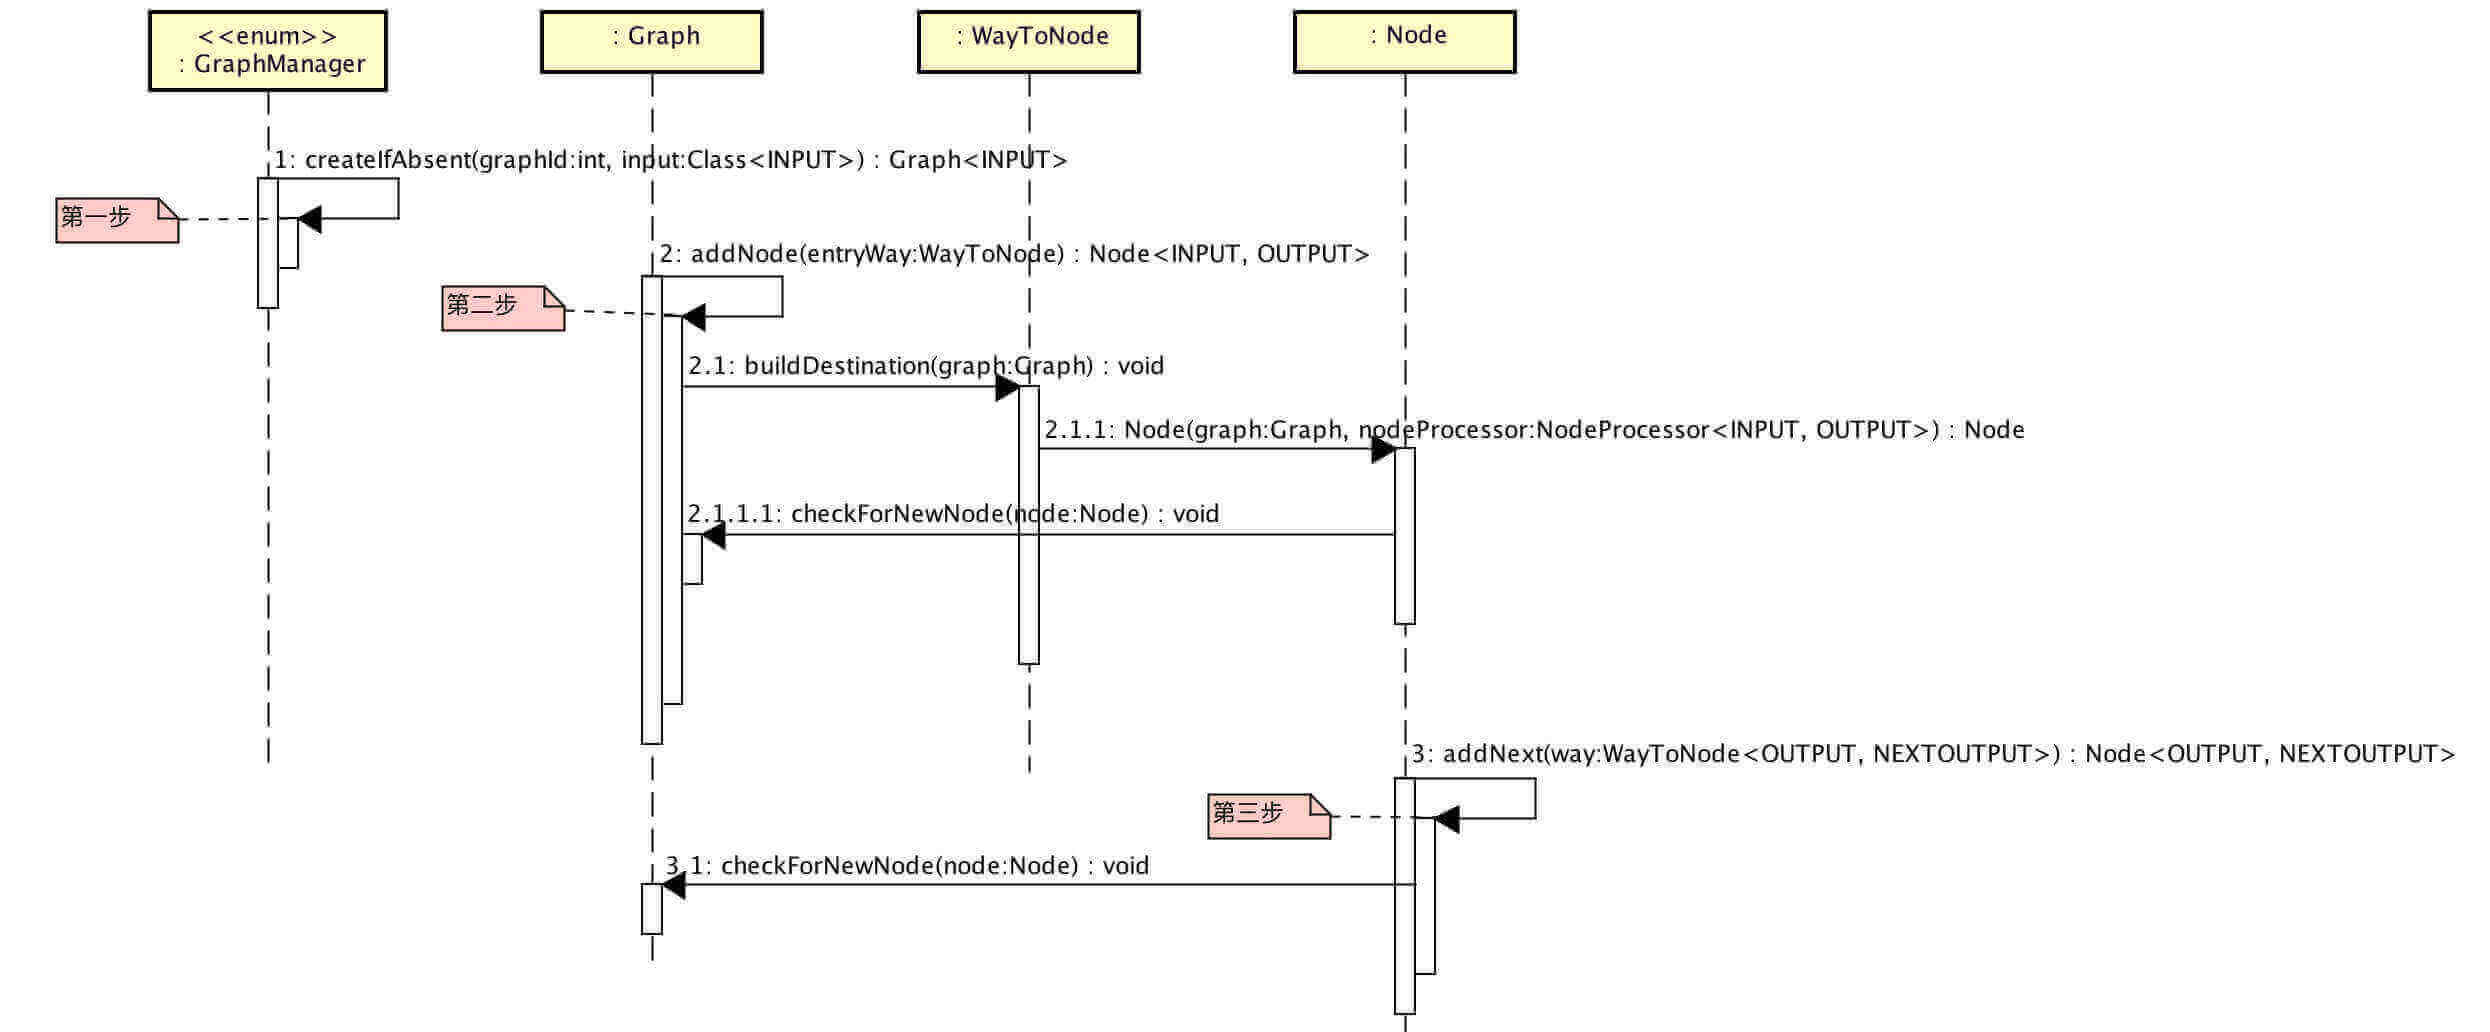
第一步
GraphManager#createIfAbsent(graphId, input)方法,创建一个Graph对象,并添加到 Graph 映射第二步
Graph#addNode(WayToNode)方法,创建该Graph的首个Node对象。第三步
Node#addNext(WayToNode)方法,创建该Node的下一个Node对象。
Graph 启动

| 数据流向 | FROM | TO | 逻辑 |
|---|---|---|---|
| 第一步 | Graph | WayToNode | |
| 第二步 | WayToNode | Node | |
| 第三步 | Node | NodeProcessor | |
| 第四步 | NodeProcessor | Next | 根据具体实现,若到 Next ,重复第一步 |
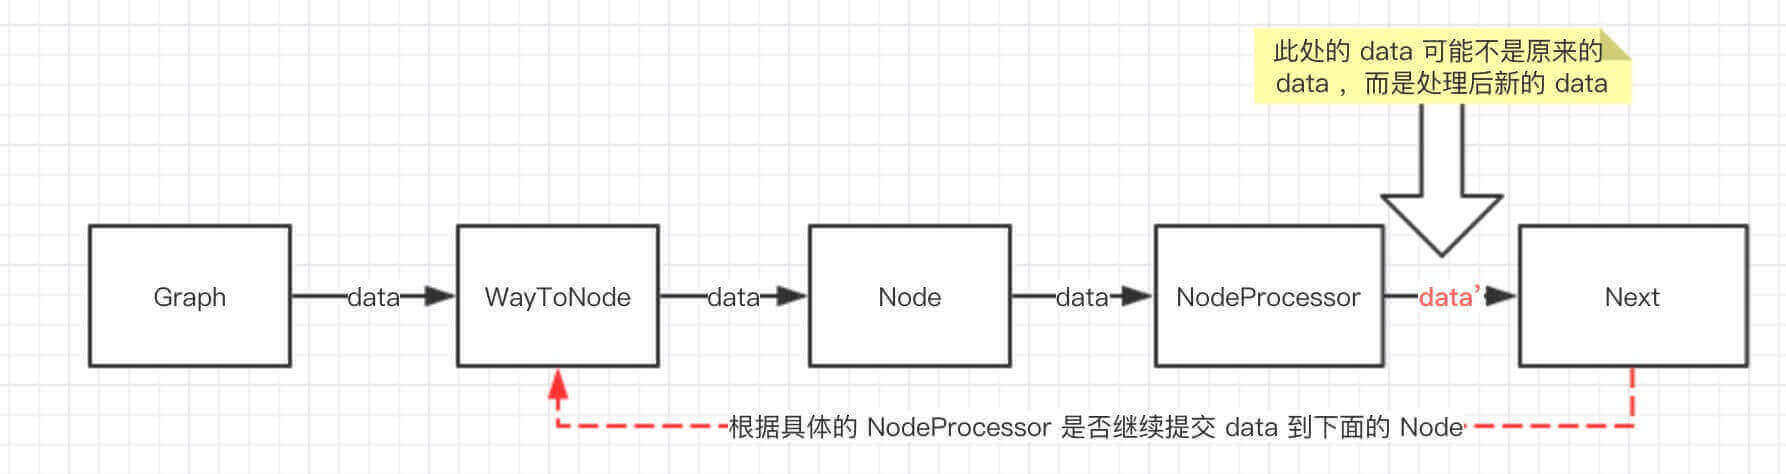
WayToNode
在
graph包的基础上,提供异步、跨节点等等的流式处理的封装。主要在 WayToNode 、NodeProcessor 的实现类上做文章。
新版本的变动
各类Provider -> 各类ServerHandler -> 各类Handler预处理(JVMSourceDispatcher) -> DispatcherManager
DispatcherManager(根据scope选取dispatcher处理) -> AbstractWorker(真正的Work) -> DataCarrier(异步处理库)
1 | IndicatorRemoteWorker直接remoteClient实例Push外网其他节点工作构建 并保存到异步处理库 |
数据消费处理
DataCarrier(异步处理库) -> consume(consumerPool#begin()) -> consumerThread.start() -> dataSource.obtain();
dataSource.obtain();(获得数据,开始消费) -> RemoteMessageConsumer/PersistentConsumer引出各类真正的Consumer -> 执行操作
Node转换为Worker,并且Worker以各类形态示人
国内查看评论需要代理~