阿里流量哨兵组件 相关的源码详解笔记
简介
结构上的重点
1
2
3
4
5
6
7
8
9
10
11
12
13
14
15
16
17
18
19
20
21
22
23
24
25
26
27
28
29
30
31
32
由于一个ContextName对应的同一个Resource共享同一个SlotChain,所以同一个ContextName对应的同一个Resource对应同一个ClusterBuilderSlot 由于一个ClusterBuilderSlot对应一个ClusterNode,所以同一个ContextName对应的同一个Resource对应同一个ClusterNode。 在 Context初始化过程中,首先会从threadLocal中获取当前线程是否有上下文,如果没有则从缓存中根据ContextName获取EntranceNode 如果EntranceNode不存在,则创建EntranceNode,然后初始化Context。 所以一个线程对应一个Context,一个ContextName对应多个Context,一个ContextName共享一个EntranceNode。 在获取Entry的过程中,首先会获取Context,如果Context不存在,则默认创建一个新的,然后根据 Resource获取SlotChain 这里SlotChain是根据Resource一一对应, resourceName相同则表明是一个Resource, 同时一次请求会创建一个 Entry,一个Entry和一次请求一一对应。 每当我们调用SphU.entry() 或者 SphO.entry()获取访问资源许可的时候都需要当前线程处在某个context中,如果我们没有显式调用ContextUtil.enter(),默认会使用Default context。 如果我们在一个上下文中多次调用SphU.entry()来获取多个资源,一个调用树就会被创建出来 每次SphU.entry()调用都会返回一个Entry,Entry保持了所有关于当前资源调用的信息: createTime 这个资源调用的创建时间 currentNode SphU.entry请求进入的资源在当前上下文中的统计数据Node originNode SphU.entry请求进入的资源对于特定origin调用方的统计数据node 它其中除了上述信息之外,还保存了额外的信息: parent 调用树链条中上一个entry child 调用树链条中的下一个entry chain 当前调用资源所使用的限流工作责任链,包括各个Slot context 当前调用点所属的上下文 entranceNode作为上下文的入口,每个context name对应全局一个entranceNode context是线程相关的,就算context name一样,但是不同线程的context是不同的(虽然他们关联的entranceNode是一样) defaultNode对于同一个resource的不同context name有不同的统计实例,但非线程相关 clusterNode是一个resource的全局统计 同一个resource全局共享同一个slot chain
Hystrix对比
对比内容
Sentinel
Hystrix
隔离策略
信号量隔离
线程池隔离/信号量隔离
熔断降级策略
基于响应时间或失败比率
基于失败比率
实时指标实现
滑动窗口
滑动窗口(基于 RxJava)
规则配置
支持多种数据源
支持多种数据源
扩展性
多个扩展点
插件的形式
基于注解的支持
支持
支持
限流
基于 QPS,支持基于调用关系的限流
不支持
流量整形
支持慢启动、匀速器模式
不支持
系统负载保护
支持
不支持
控制台
开箱即用,可配置规则、查看秒级监控、机器发现等
不完善
常见框架的适配
Servlet、Spring Cloud、Dubbo、gRPC 等
Servlet、Spring Cloud Netflix
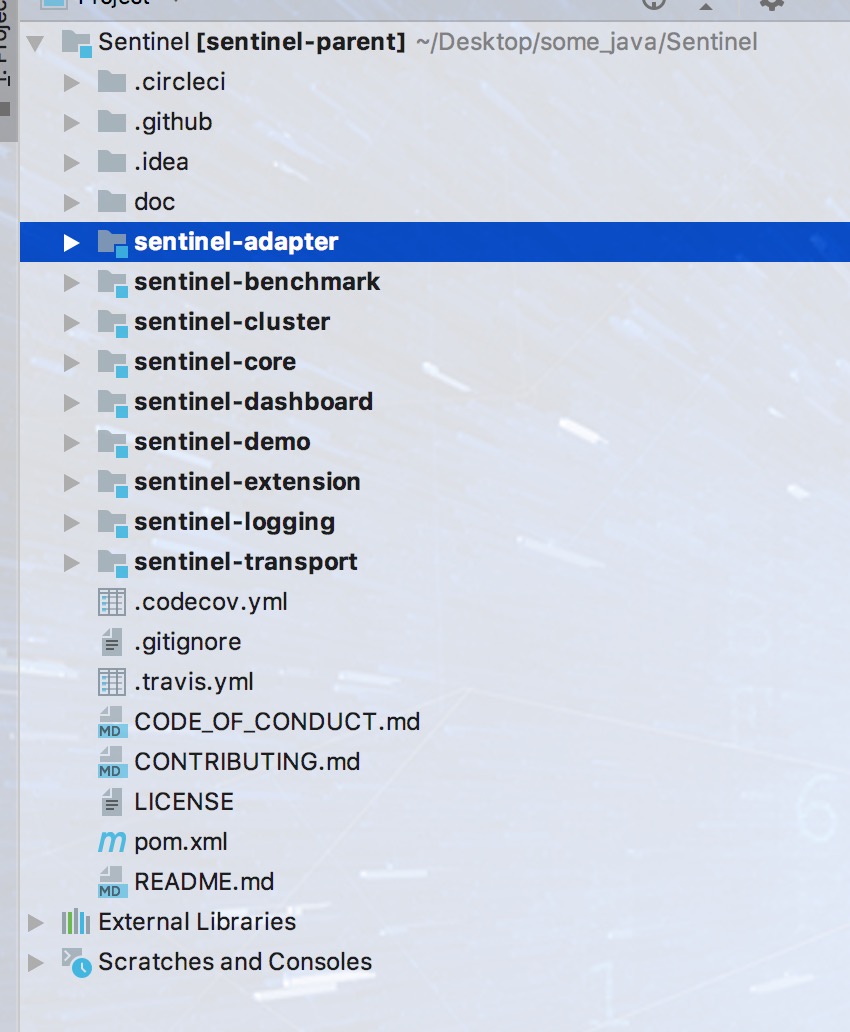
基本轮廓
sentinel-core 核心模块,限流、降级、系统保护等都在这里实现
sentinel-dashboard 控制台模块,可以对连接上的sentinel客户端实现可视化的管理
sentinel-transport 传输模块,提供了基本的监控服务端和客户端的API接口,以及一些基于不同库的实现
sentinel-extension 扩展模块,主要对DataSource进行了部分扩展实现
sentinel-adapter 适配器模块,主要实现了对一些常见框架的适配
sentinel-demo 样例模块,可参考怎么使用sentinel进行限流、降级等
sentinel-benchmark 基准测试模块,对核心代码的精确性提供基准测试
demo演示 1 2 3 4 5 6 7 8 9 10 11 12 13 14 15 16 17 18 19 20 21 22 23 24 25 26 27 28 29 30 31 32 33 34 35 36 37 38 39 40 41 42 43 44 45 46 47 48 49 50 51 52 53 54 55 56 57 58 59 60 61 62 63 64 65 66 67 68 69 70 71 72 73 74 75 76 77 78 79 80 81 82 83 84 85 86 87 88 89 90 91 92 93 94 95 96 97 98 99 100 101 102 103 104 105 106 107 108 109 110 111 112 113 114 115 116 117 118 119 120 121 122 123 124 125 126 127 128 129 130 131 132 133 134 135 136 137 138 139 140 141 142 143 144 145 146 147 148 149 150 151 152 153 154 155 156 157 158 159 160 161 162 package com.alibaba.csp.sentinel.demo.flow;import java.util.ArrayList;import java.util.List;import java.util.Random;import java.util.concurrent.TimeUnit;import java.util.concurrent.atomic.AtomicInteger;import com.alibaba.csp.sentinel.util.TimeUtil;import com.alibaba.csp.sentinel.Entry;import com.alibaba.csp.sentinel.SphU;import com.alibaba.csp.sentinel.slots.block.BlockException;import com.alibaba.csp.sentinel.slots.block.RuleConstant;import com.alibaba.csp.sentinel.slots.block.flow.FlowRule;import com.alibaba.csp.sentinel.slots.block.flow.FlowRuleManager;public class FlowQpsDemo private static final String KEY = "abc" ; private static AtomicInteger pass = new AtomicInteger(); private static AtomicInteger block = new AtomicInteger(); private static AtomicInteger total = new AtomicInteger(); private static volatile boolean stop = false ; private static final int threadCount = 32 ; private static int seconds = 60 + 40 ; public static void main (String[] args) throws Exception initFlowQpsRule(); tick(); simulateTraffic(); System.out.println("===== begin to do flow control" ); System.out.println("only 20 requests per second can pass" ); } private static void initFlowQpsRule () List<FlowRule> rules = new ArrayList<FlowRule>(); FlowRule rule1 = new FlowRule(); rule1.setResource(KEY); rule1.setCount(20 ); rule1.setGrade(RuleConstant.FLOW_GRADE_QPS); rule1.setLimitApp("default" ); rules.add(rule1); FlowRuleManager.loadRules(rules); } private static void simulateTraffic () for (int i = 0 ; i < threadCount; i++) { Thread t = new Thread(new RunTask()); t.setName("simulate-traffic-Task" ); t.start(); } } private static void tick () Thread timer = new Thread(new TimerTask()); timer.setName("sentinel-timer-task" ); timer.start(); } static class TimerTask implements Runnable @Override public void run () long start = System.currentTimeMillis(); System.out.println("begin to statistic!!!" ); long oldTotal = 0 ; long oldPass = 0 ; long oldBlock = 0 ; while (!stop) { try { TimeUnit.SECONDS.sleep(1 ); } catch (InterruptedException e) { } long globalTotal = total.get(); long oneSecondTotal = globalTotal - oldTotal; oldTotal = globalTotal; long globalPass = pass.get(); long oneSecondPass = globalPass - oldPass; oldPass = globalPass; long globalBlock = block.get(); long oneSecondBlock = globalBlock - oldBlock; oldBlock = globalBlock; System.out.println(seconds + " send qps is: " + oneSecondTotal); System.out.println(TimeUtil.currentTimeMillis() + ", total:" + oneSecondTotal + ", pass:" + oneSecondPass + ", block:" + oneSecondBlock); if (seconds-- <= 0 ) { stop = true ; } } long cost = System.currentTimeMillis() - start; System.out.println("time cost: " + cost + " ms" ); System.out.println("total:" + total.get() + ", pass:" + pass.get() + ", block:" + block.get()); System.exit(0 ); } } static class RunTask implements Runnable @Override public void run () while (!stop) { Entry entry = null ; try { entry = SphU.entry(KEY); pass.addAndGet(1 ); } catch (BlockException e1) { block.incrementAndGet(); } catch (Exception e2) { } finally { total.incrementAndGet(); if (entry != null ) { entry.exit(); } } Random random2 = new Random(); try { TimeUnit.MILLISECONDS.sleep(random2.nextInt(50 )); } catch (InterruptedException e) { } } } } }
运行结果
1
2
3
4
5
6
7
8
9
10
11
12
13
14
15
16
17
18
19
20
21
22
23
24
25
26
27
28
29
30
31
32
33
34
35
36
begin to statistic!!! ===== begin to do flow control only 20 requests per second can pass 100 send qps is: 1064 1595901444029, total:1064, pass:46, block:1018 99 send qps is: 1100 1595901445033, total:1100, pass:20, block:1080 98 send qps is: 1113 1595901446037, total:1113, pass:22, block:1091 97 send qps is: 1110 1595901447040, total:1110, pass:20, block:1090 96 send qps is: 1115 1595901448043, total:1115, pass:21, block:1094 95 send qps is: 1123 1595901449047, total:1123, pass:22, block:1101 94 send qps is: 1137 1595901450049, total:1137, pass:22, block:1115 93 send qps is: 1127 1595901451053, total:1127, pass:20, block:1107 92 send qps is: 1175 1595901452058, total:1175, pass:20, block:1155 91 send qps is: 1150 1595901453062, total:1150, pass:20, block:1130 90 send qps is: 1154 1595901454065, total:1154, pass:22, block:1132 89 send qps is: 1145 1595901455069, total:1145, pass:21, block:1124 88 send qps is: 1147 1595901456071, total:1147, pass:20, block:1127 87 send qps is: 1122 1595901457075, total:1122, pass:21, block:1101 86 send qps is: 1136 1595901458079, total:1136, pass:21, block:1115 85 send qps is: 1138 1595901459081, total:1138, pass:21, block:1117 84 send qps is: 1140
可以看到上面的结果中,pass的数量和我们的预期并不相同,我们预期的是每秒允许pass的请求数是20个,但是目前有很多pass的请求数是超过20个的。
原因是我们这里测试的代码使用了多线程,注意看 threadCount 的值,一共有32个线程来模拟,而在RunTask的run方法中执行资源保护时,即在SphU.entry的内部是没有加锁的,所以就会导致在高并发下,pass的数量会高于20。
可以用下面这个模型来描述下,有一个TimeTicker线程在做统计,每1秒钟做一次。
由于pass、block、total等计数器是全局共享的,而多个RunTask线程在执行SphU.entry申请获取entry时,内部没有锁保护所以会存在pass的个数超过设定的阈值。
那接下来我把 threadCount 的值改为1,只有一个线程来执行这个方法,看下具体的限流结果,执行上面的代码后打印的结果如下:
1
2
3
4
5
6
7
8
9
10
11
12
13
14
15
16
17
18
19
20
INFO: Sentinel log name use pid is: false begin to statistic!!! ===== begin to do flow control only 20 requests per second can pass 100 send qps is: 39 1595906689977, total:39, pass:23, block:19 99 send qps is: 42 1595906690981, total:42, pass:20, block:22 98 send qps is: 36 1595906691985, total:36, pass:20, block:16 97 send qps is: 36 1595906692990, total:36, pass:20, block:16 96 send qps is: 42 1595906693990, total:42, pass:20, block:22 95 send qps is: 41 1595906694995, total:41, pass:20, block:21 94 send qps is: 32 1595906695999, total:32, pass:20, block:12 93 send qps is: 34 1595906697001, total:34, pass:20, block:14
可以看到pass数基本上维持在20,但是第一次统计的pass值还是超过了20。这又是什么原因导致的呢?
其实仔细看下Demo中的代码可以发现,模拟请求是用的一个线程,统计结果是用的另外一个线程,统计线程每1秒钟统计一次结果,这两个线程之间是有时间上的误差的。从TimeTicker线程打印出来的时间戳可以看出来,虽然每隔一秒进行统计,但是当前打印时的时间和上一次的时间还是有误差的,不完全是1000ms的间隔。
要真正验证每秒限制20个请求,保证数据的精准性,需要做基准测试,这个不是本篇文章的重点,有兴趣的可以去了解下jmh,sentinel中的基准测试也是通过jmh做的。
原理 首先从入口开始:SphU.entry()。
这个方法会去申请一个entry,如果能够申请成功则说明没有被限流,否则会抛出BlockException表面已经被限流了。
从SphU.entry()方法往下执行会进入到Sph.entry(),Sph的默认实现类是CtSph,在CtSph中最终会执行到entry(ResourceWrapper resourceWrapper, int count, Object... args) throws BlockException这个方法。
我们来看一下这个方法的具体实现
1
2
3
4
5
6
7
8
9
10
11
12
13
14
15
16
17
18
19
20
21
22
23
24
25
26
27
28
29
30
31
32
33
34
35
36
37
38
39
40
public Entry entry (ResourceWrapper resourceWrapper, int count, Object... args) throws BlockException Context context = ContextUtil.getContext(); if (context instanceof NullContext) { return new CtEntry(resourceWrapper, null , context); } if (context == null ) { context = MyContextUtil.myEnter(Constants.CONTEXT_DEFAULT_NAME, "" , resourceWrapper.getType()); } if (!Constants.ON) { return new CtEntry(resourceWrapper, null , context); } ProcessorSlot<Object> chain = lookProcessChain(resourceWrapper); if (chain == null ) { return new CtEntry(resourceWrapper, null , context); } Entry e = new CtEntry(resourceWrapper, chain, context); try { chain.entry(context, resourceWrapper, null , count, args); } catch (BlockException e1) { e.exit(count, args); throw e1; } catch (Throwable e1) { RecordLog.info("Sentinel unexpected exception" , e1); } return e; }
1.对参数和全局配置项做检测,如果不符合要求就直接返回了一个CtEntry对象,不会再进行后面的限流检测,否则进入下面的检测流程。
2.根据包装过的资源对象获取对应的SlotChain
3.执行SlotChain的entry方法
3.1.如果SlotChain的entry方法抛出了BlockException,则将该异常继续向上抛出
3.2.如果SlotChain的entry方法正常执行了,则最后会将该entry对象返回
4.如果上层方法捕获了BlockException,则说明请求被限流了,否则请求能正常执行
创建SlotChain 1 2 3 4 5 6 7 8 9 10 11 12 13 14 15 16 17 18 19 20 21 22 23 24 25 26 27 28 29 30 31 32 33 34 35 36 37 38 39 40 41 42 43 44 45 46 47 48 49 50 51 52 53 54 55 56 57 58 59 60 61 62 63 64 ProcessorSlot<Object> lookProcessChain (ResourceWrapper resourceWrapper) { ProcessorSlotChain chain = chainMap.get(resourceWrapper); if (chain == null ) { synchronized (LOCK) { chain = chainMap.get(resourceWrapper); if (chain == null ) { if (chainMap.size() >= Constants.MAX_SLOT_CHAIN_SIZE) { return null ; } chain = SlotChainProvider.newSlotChain(); Map<ResourceWrapper, ProcessorSlotChain> newMap = new HashMap<ResourceWrapper, ProcessorSlotChain>( chainMap.size() + 1 ); newMap.putAll(chainMap); newMap.put(resourceWrapper, chain); chainMap = newMap; } } } return chain; } ... public static ProcessorSlotChain newSlotChain () if (slotChainBuilder != null ) { return slotChainBuilder.build(); } slotChainBuilder = SpiLoader.loadFirstInstanceOrDefault(SlotChainBuilder.class, DefaultSlotChainBuilder.class); if (slotChainBuilder == null ) { RecordLog.warn("[SlotChainProvider] Wrong state when resolving slot chain builder, using default" ); slotChainBuilder = new DefaultSlotChainBuilder(); } else { RecordLog.info("[SlotChainProvider] Global slot chain builder resolved: " + slotChainBuilder.getClass().getCanonicalName()); } return slotChainBuilder.build(); } ... public ProcessorSlotChain build () ProcessorSlotChain chain = new DefaultProcessorSlotChain(); List<ProcessorSlot> sortedSlotList = SpiLoader.loadPrototypeInstanceListSorted(ProcessorSlot.class); for (ProcessorSlot slot : sortedSlotList) { if (!(slot instanceof AbstractLinkedProcessorSlot)) { RecordLog.warn("The ProcessorSlot(" + slot.getClass().getCanonicalName() + ") is not an instance of AbstractLinkedProcessorSlot, can't be added into ProcessorSlotChain" ); continue ; } chain.addLast((AbstractLinkedProcessorSlot<?>) slot); } return chain; }
该方法使用了一个HashMap做了缓存,key是资源对象。double check。具体构造chain的方法是通过:Env.slotsChainbuilder.build()这句代码创建的。
以上代码翻译
1
2
3
4
5
6
7
8
9
10
ProcessorSlotChain chain = new DefaultProcessorSlotChain(); chain.addLast(new NodeSelectorSlot()); chain.addLast(new ClusterBuilderSlot()); chain.addLast(new LogSlot()); chain.addLast(new StatisticSlot()); chain.addLast(new SystemSlot()); chain.addLast(new AuthoritySlot()); chain.addLast(new FlowSlot()); chain.addLast(new DegradeSlot()); return chain;
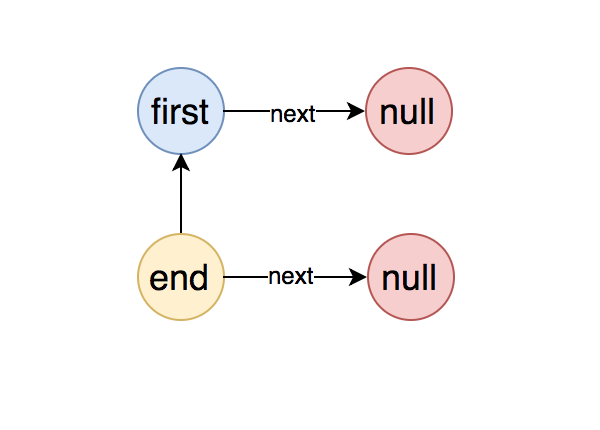
SlotChain结构 1 2 3 4 5 6 7 8 9 10 11 12 13 14 15 16 17 18 19 20 21 22 23 24 25 26 27 28 29 30 31 public class DefaultProcessorSlotChain extends ProcessorSlotChain AbstractLinkedProcessorSlot<?> first = new AbstractLinkedProcessorSlot<Object>() { @Override public void entry (Context context, ResourceWrapper resourceWrapper, Object t, int count, Object... args) throws Throwable { super .fireEntry(context, resourceWrapper, t, count, args); } @Override public void exit (Context context, ResourceWrapper resourceWrapper, int count, Object... args) super .fireExit(context, resourceWrapper, count, args); } }; AbstractLinkedProcessorSlot<?> end = first; @Override public void addFirst (AbstractLinkedProcessorSlot<?> protocolProcessor) protocolProcessor.setNext(first.getNext()); first.setNext(protocolProcessor); if (end == first) { end = protocolProcessor; } } @Override public void addLast (AbstractLinkedProcessorSlot<?> protocolProcessor) end.setNext(protocolProcessor); end = protocolProcessor; } }
DefaultProcessorSlotChain中有两个AbstractLinkedProcessorSlot类型的变量:first和end,这就是链表的头结点和尾节点。
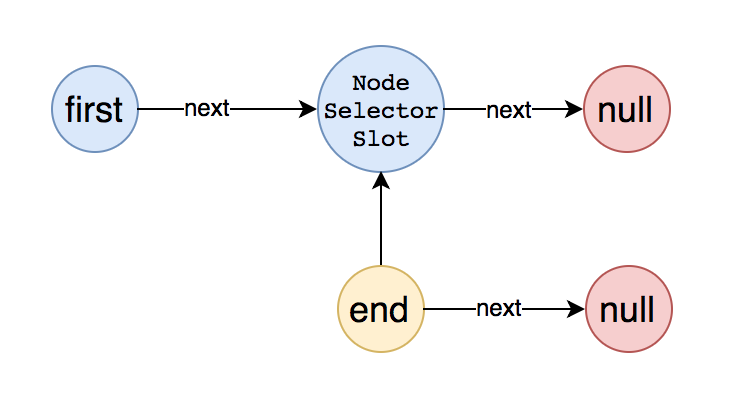
将第一个节点添加到链表中后,整个链表的结构变成了如下图这样:
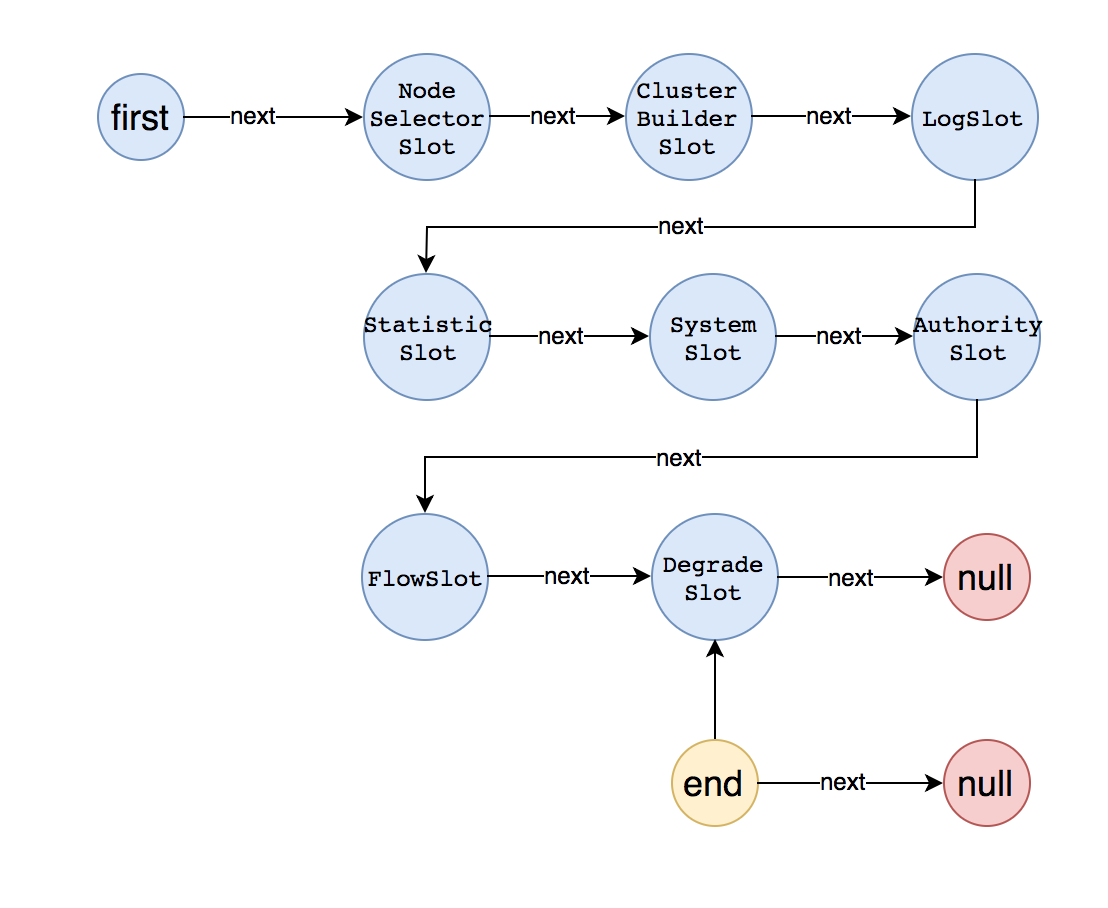
将所有的节点都加入到链表中后,整个链表的结构变成了如下图所示:
这样就将所有的Slot对象添加到了链表中去了,每一个Slot都是继承自AbstractLinkedProcessorSlot。而AbstractLinkedProcessorSlot是一种责任链的设计,每个对象中都有一个next属性,指向的是另一个AbstractLinkedProcessorSlot对象。其实责任链模式在很多框架中都有,比如Netty中是通过pipeline来实现的。
知道了SlotChain是如何创建的了,那接下来就要看下是如何执行Slot的entry方法的了。
SlotChain执行流程 执行SlotChain的entry方法 lookProcessChain方法获得的ProcessorSlotChain的实例是DefaultProcessorSlotChain,那么执行chain.entry方法,就会执行DefaultProcessorSlotChain的entry方法,而DefaultProcessorSlotChain的entry方法是这样的:
1 2 3 4 5 @Override public void entry (Context context, ResourceWrapper resourceWrapper, Object t, int count, Object... args) throws Throwable { first.transformEntry(context, resourceWrapper, t, count, args); }
也就是说,DefaultProcessorSlotChain的entry实际是执行的first属性的transformEntry方法。
而transformEntry方法会执行当前节点的entry方法,在DefaultProcessorSlotChain中first节点重写了entry方法,具体如下
1 2 3 4 5 @Override public void entry (Context context, ResourceWrapper resourceWrapper, Object t, int count, Object... args) throws Throwable { super .fireEntry(context, resourceWrapper, t, count, args); }
first节点的entry方法,实际又是执行的super的fireEntry方法,那继续把目光转移到fireEntry方法,具体如下:
1 2 3 4 5 6 7 @Override public void fireEntry (Context context, ResourceWrapper resourceWrapper, Object obj, int count, Object... args) throws Throwable { if (next != null ) { next.transformEntry(context, resourceWrapper, obj, count, args); } }
从fireEntry方法中就开始传递执行entry了,这里会执行当前节点的下一个节点transformEntry方法,上面已经分析过了,transformEntry方法会触发当前节点的entry,也就是说fireEntry方法实际是触发了下一个节点的entry方法
执行Slot的entry方法 现在可以把目光转移到SlotChain中的第一个节点NodeSelectorSlot的entry方法中去了,具体的代码如下:
1 2 3 4 5 6 7 8 9 10 11 12 13 14 15 16 17 18 19 20 21 22 23 24 @Override public void entry (Context context, ResourceWrapper resourceWrapper, Object obj, int count, Object... args) throws Throwable { DefaultNode node = map.get(context.getName()); if (node == null ) { synchronized (this ) { node = map.get(context.getName()); if (node == null ) { node = Env.nodeBuilder.buildTreeNode(resourceWrapper, null ); HashMap<String, DefaultNode> cacheMap = new HashMap<String, DefaultNode>(map.size()); cacheMap.putAll(map); cacheMap.put(context.getName(), node); map = cacheMap; } ((DefaultNode)context.getLastNode()).addChild(node); } } context.setCurNode(node); fireEntry(context, resourceWrapper, node, count, args); }
从代码中可以看到,NodeSelectorSlot节点做了一些自己的业务逻辑处理,具体的大家可以深入源码继续追踪,这里大概的介绍下每种Slot的功能职责:
NodeSelectorSlot 负责收集资源的路径,并将这些资源的调用路径,以树状结构存储起来,用于根据调用路径来限流降级;
ClusterBuilderSlot 则用于存储资源的统计信息以及调用者信息,例如该资源的 RT, QPS, thread count 等等,这些信息将用作为多维度限流,降级的依据;
StatistcSlot 则用于记录,统计不同纬度的 runtime 信息;
FlowSlot 则用于根据预设的限流规则,以及前面 slot 统计的状态,来进行限流;
AuthorizationSlot 则根据黑白名单,来做黑白名单控制;
DegradeSlot 则通过统计信息,以及预设的规则,来做熔断降级;
SystemSlot 则通过系统的状态,例如 load1 等,来控制总的入口流量;
sentinel主要是基于7种不同的Slot形成了一个链表,每个Slot都各司其职,自己做完分内的事之后,会把请求传递给下一个Slot,直到在某一个Slot中命中规则后抛出BlockException而终止。
前三个Slot负责做统计,后面的Slot负责根据统计的结果结合配置的规则进行具体的控制,是Block该请求还是放行。
控制的类型也有很多可选项:根据qps、线程数、冷启动等等。
然后基于这个核心的方法,衍生出了很多其他的功能:
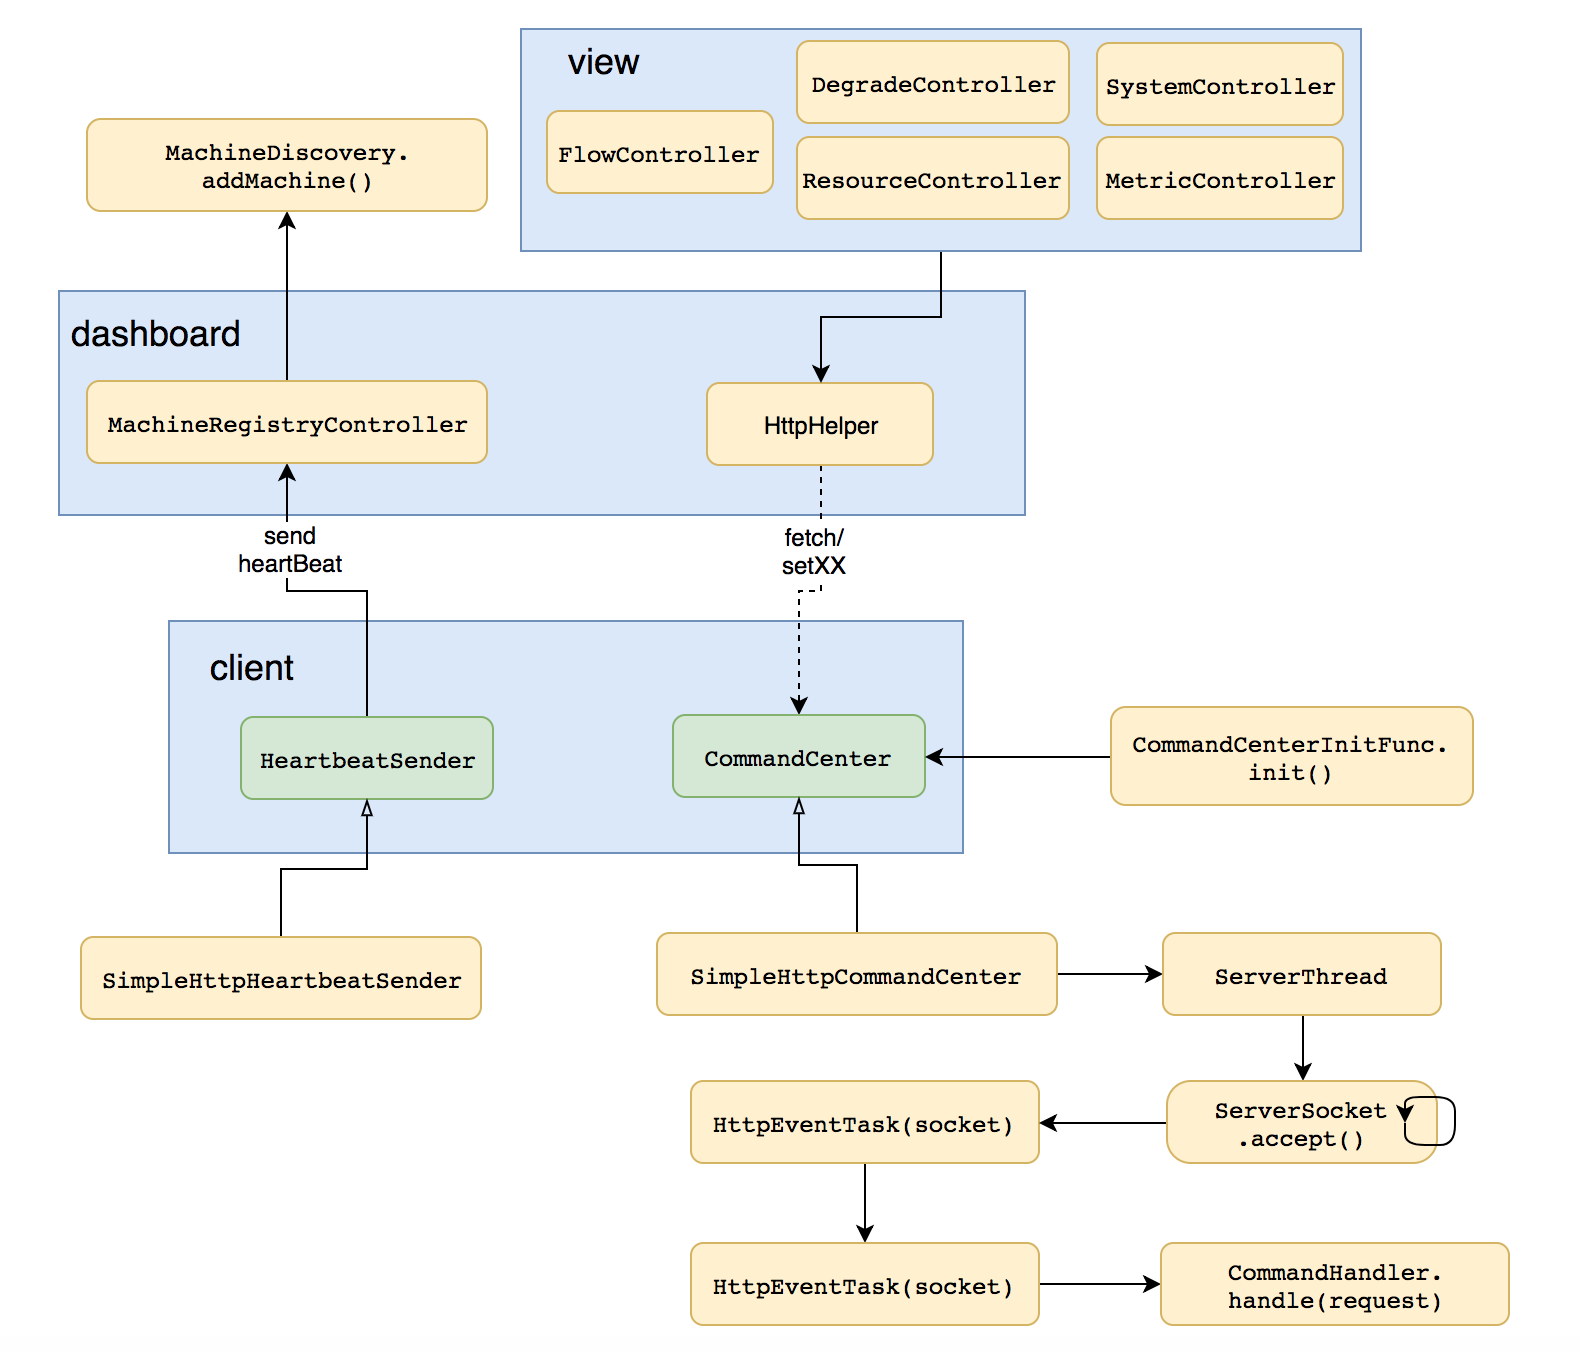
1、dashboard控制台,可以可视化的对每个连接过来的sentinel客户端 (通过发送heartbeat消息)进行控制,dashboard和客户端之间通过http协议进行通讯。
2、规则的持久化,通过实现DataSource接口,可以通过不同的方式对配置的规则进行持久化,默认规则是在内存中的
3、对主流的框架进行适配,包括servlet,dubbo,rRpc等
引入客户端 确保客户端有访问量,Sentinel 会在客户端首次调用的时候进行初始化,开始向控制台发送心跳包。
sentinel-dashboard是一个独立的web应用,可以接受客户端的连接,然后与客户端之间进行通讯,他们之间使用http协议进行通讯。他们之间的关系如下图所示:
规则 持久化,动态化 Sentinel 的理念是开发者只需要关注资源的定义,当资源定义成功,可以动态增加各种流控降级规则。
Sentinel 提供两种方式修改规则:
通过 API 直接修改 (loadRules)
通过DataSource适配不同数据源修改
通过 API 修改比较直观,可以通过以下三个 API 修改不同的规则:
1 2 3 FlowRuleManager.loadRules(List<FlowRule> rules); DegradeRuleManager.loadRules(List<DegradeRule> rules); SystemRuleManager.loadRules(List<SystemRule> rules);
DataSource 扩展 上述 loadRules() 方法只接受内存态的规则对象,但应用重启后内存中的规则就会丢失,更多的时候规则最好能够存储在文件、数据库或者配置中心中。
DataSource 接口给我们提供了对接任意配置源的能力。相比直接通过 API 修改规则,实现 DataSource 接口是更加可靠的做法。
官方推荐通过控制台设置规则后将规则推送到统一的规则中心,用户只需要实现 DataSource 接口,来监听规则中心的规则变化,以实时获取变更的规则。
DataSource 拓展常见的实现方式有:
拉模式:客户端主动向某个规则管理中心定期轮询拉取规则,这个规则中心可以是 SQL、文件,甚至是 VCS 等。这样做的方式是简单,缺点是无法及时获取变更;
推模式:规则中心统一推送,客户端通过注册监听器的方式时刻监听变化,比如使用 Nacos、Zookeeper 等配置中心。这种方式有更好的实时性和一致性保证。
资源调用链原理分析 这里大概的介绍下每种Slot的功能职责:
NodeSelectorSlot 负责收集资源的路径,并将这些资源的调用路径,以树状结构存储起来,用于根据调用路径来限流降级;
ClusterBuilderSlot 则用于存储资源的统计信息以及调用者信息,例如该资源的 RT, QPS, thread count 等等,这些信息将用作为多维度限流,降级的依据;
StatisticsSlot 则用于记录,统计不同维度的 runtime 信息;
SystemSlot 则通过系统的状态,例如 load1 等,来控制总的入口流量;
AuthoritySlot 则根据黑白名单,来做黑白名单控制;
FlowSlot 则用于根据预设的限流规则,以及前面 slot 统计的状态,来进行限流;
DegradeSlot 则通过统计信息,以及预设的规则,来做熔断降级;
每个Slot执行完业务逻辑处理后,会调用fireEntry()方法,该方法将会触发下一个节点的entry方法,下一个节点又会调用他的fireEntry,以此类推直到最后一个Slot,由此就形成了sentinel的责任链。
下面我们就来详细研究下这些Slot的原理。
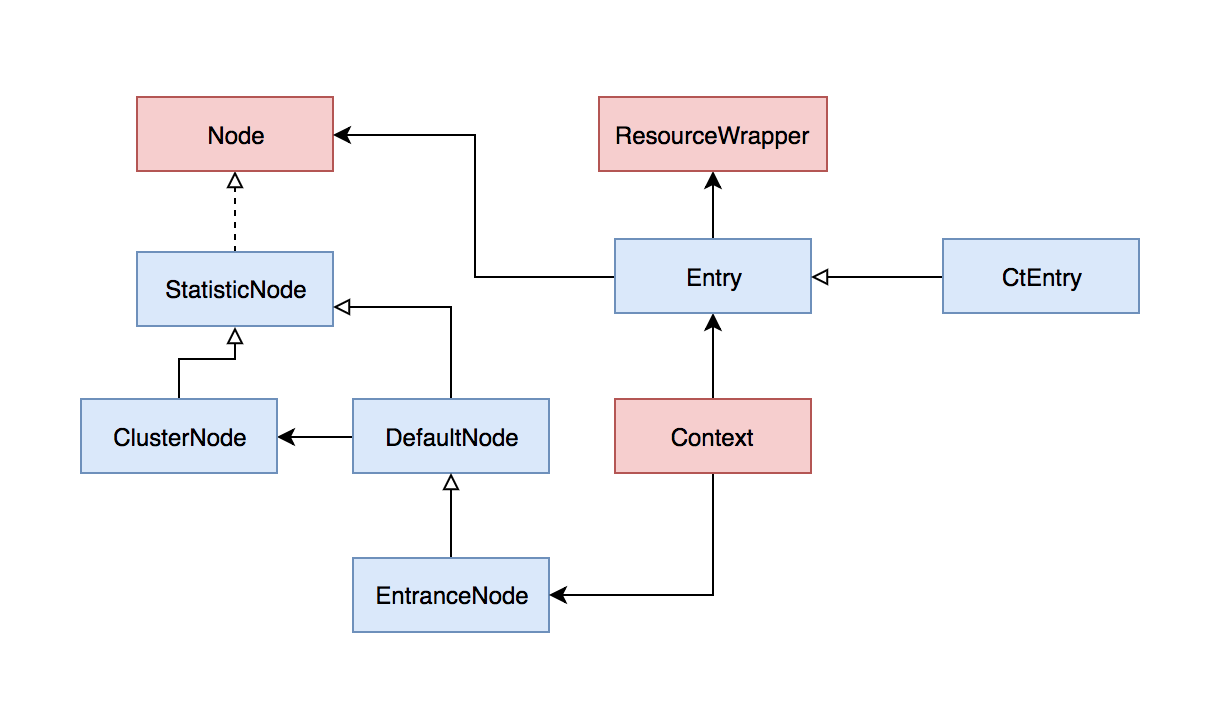
NodeSelectorSlot NodeSelectorSlot 是用来构造调用链的,具体的是将资源的调用路径,封装成一个一个的节点,再组成一个树状的结构来形成一个完整的调用链,NodeSelectorSlot是所有Slot中最关键也是最复杂的一个Slot,这里涉及到以下几个核心的概念
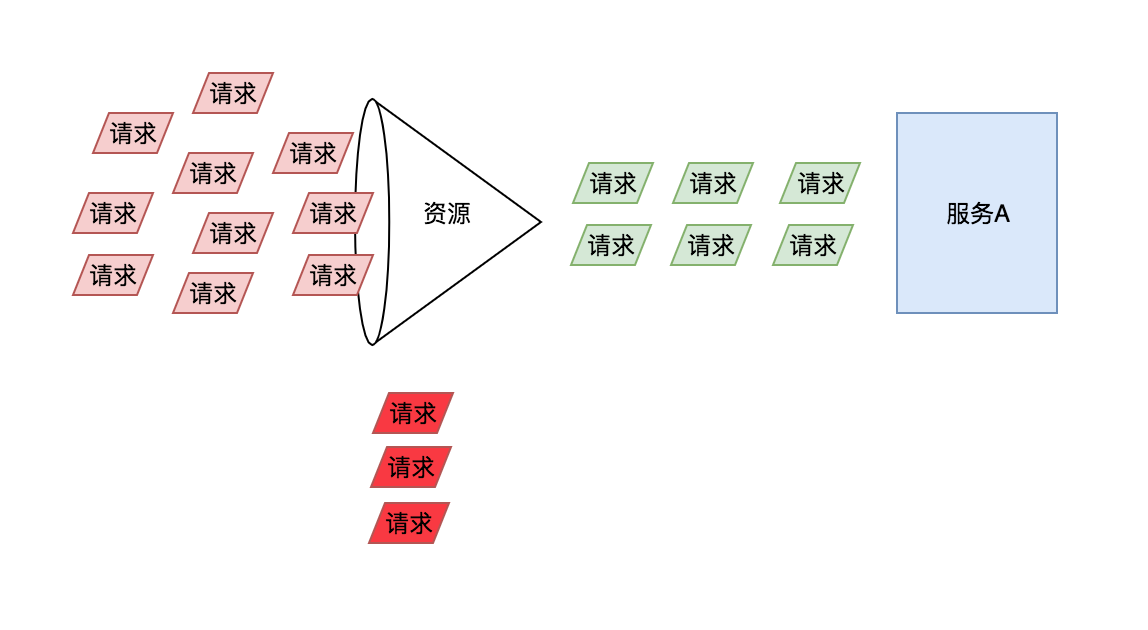
Resourcecom.alibaba.csp.sentinel.slotchain.ResourceWrapper,他有两个子类:StringResourceWrapper和MethodResourceWrapper,通过名字就知道可以将一段字符串或一个方法包装为一个资源。
1 2 3 4 5 打个比方,我有一个服务A,请求非常多,经常会被陡增的流量冲垮 为了防止这种情况,简单的做法,我们可以定义一个 Sentinel 的资源,通过该资源来对请求进行调整,使得允许通过的请求不会把服务A搞崩溃。 每个资源的状态也是不同的,这取决于资源后端的服务,有的资源可能比较稳定,有的资源可能不太稳定。 那么在整个调用链中,Sentinel 需要对不稳定资源进行控制。当调用链路中某个资源出现不稳定, 例如表现为 timeout,或者异常比例升高的时候,则对这个资源的调用进行限制,并让请求快速失败,避免影响到其它的资源,最终导致雪崩的后果。
Context
当前调用链的根节点:EntranceNode
当前的入口:Entry
当前入口所关联的节点:Node
Entry
Node
这里把几种Node的作用先大概介绍下:
节点
作用
StatisticNode
执行具体的资源统计操作
DefaultNode
该节点持有指定上下文中指定资源的统计信息,当在同一个上下文中多次调用entry方法时,该节点可能下会创建有一系列的子节点。另外每个DefaultNode中会关联一个ClusterNode
ClusterNode
该节点中保存了资源的总体的运行时统计信息,包括rt,线程数,qps等等,相同的资源会全局共享同一个ClusterNode,不管他属于哪个上下文
EntranceNode
该节点表示一棵调用链树的入口节点,通过他可以获取调用链树中所有的子节点
Context的创建与销毁 首先我们要清楚的一点就是,每次执行entry()方法,试图冲破一个资源时,都会生成一个上下文。这个上下文中会保存着调用链的根节点和当前的入口。
Context是通过ContextUtil创建的,具体的方法是trueEntry,代码如下:
1 2 3 4 5 6 7 8 9 10 11 12 13 14 15 16 17 18 19 20 21 22 23 24 25 26 27 28 29 30 31 32 protected static Context trueEnter (String name, String origin) Context context = contextHolder.get(); if (context == null ) { Map<String, DefaultNode> localCacheNameMap = contextNameNodeMap; DefaultNode node = localCacheNameMap.get(name); if (node == null ) { try { LOCK.lock(); node = contextNameNodeMap.get(name); if (node == null ) { node = new EntranceNode(new StringResourceWrapper(name, EntryType.IN), null ); Constants.ROOT.addChild(node); } } finally { LOCK.unlock(); } } context = new Context(node, name); context.setOrigin(origin); contextHolder.set(context); } return context; }
上面的代码中我省略了部分代码,只保留了核心的部分。从源码中还是可以比较清晰的看出生成Context的过程:
1.先从ThreadLocal中获取,如果能获取到直接返回,如果获取不到则继续第2步
2.从一个static的map中根据上下文的名称获取,如果能获取到则直接返回,否则继续第3步
3.加锁后进行一次double check,如果还是没能从map中获取到,则创建一个EntranceNode,并把该EntranceNode添加到一个全局的ROOT节点中去,然后将该节点添加到map中去(这部分代码在上述代码中省略了)
4.根据EntranceNode创建一个上下文,并将该上下文保存到ThreadLocal中去,下一个请求可以直接获取
那ContextUtil.exit方法什么时候会被调用呢?
有两种情况:一是主动调用ContextUtil.exit的时候,二是当一个入口Entry要退出,执行该Entry的trueExit方法的时候,此时会触发ContextUtil.exit的方法。
调用链树 当在一个上下文中多次调用了 SphU#entry() 方法时,就会创建一棵调用链树。具体的代码在entry方法中创建CtEntry对象时:
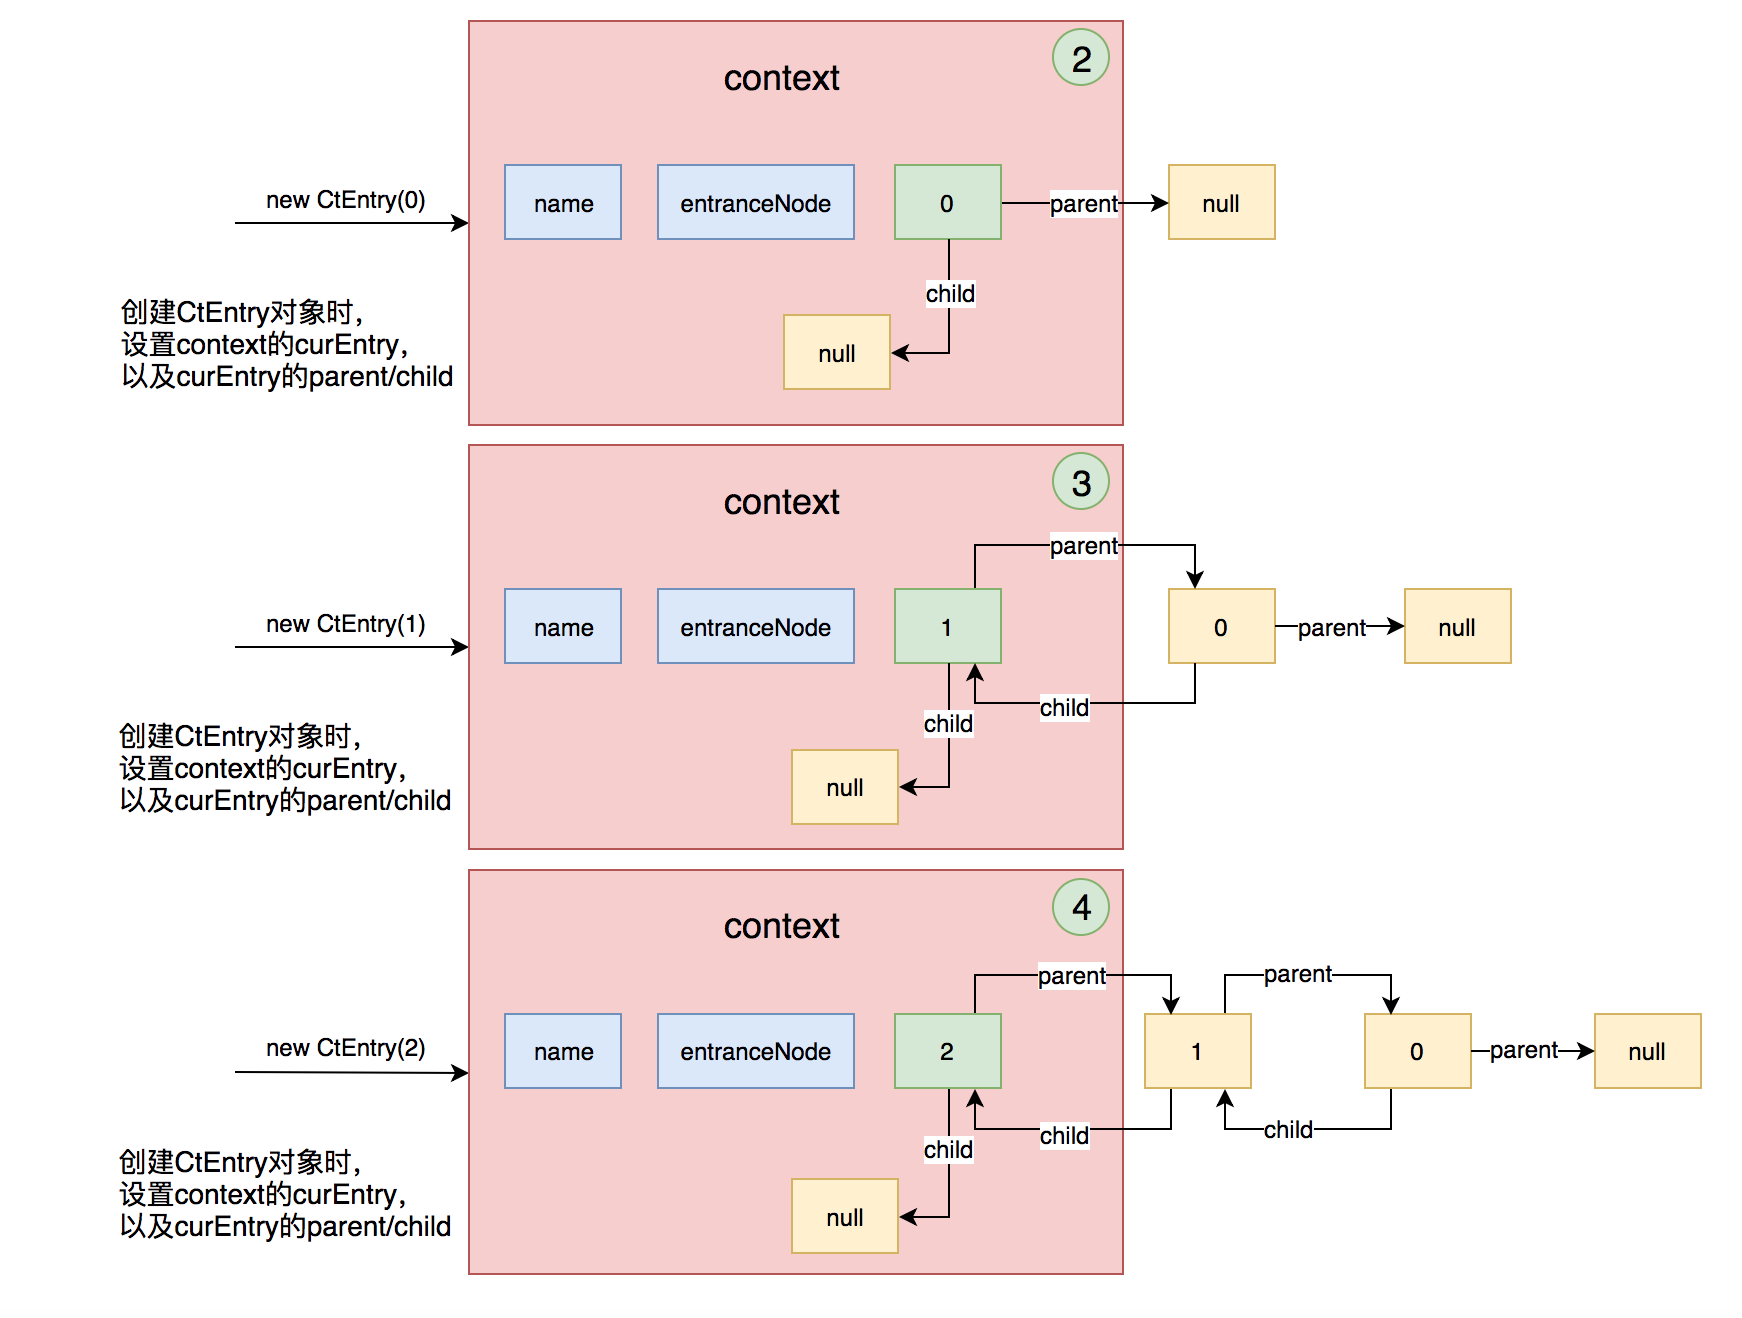
1 2 3 4 5 6 7 8 9 10 11 12 13 CtEntry(ResourceWrapper resourceWrapper, ProcessorSlot<Object> chain, Context context) { super (resourceWrapper); this .chain = chain; this .context = context; parent = context.getCurEntry(); if (parent != null ) { ((CtEntry)parent).child = this ; } context.setCurEntry(this ); }
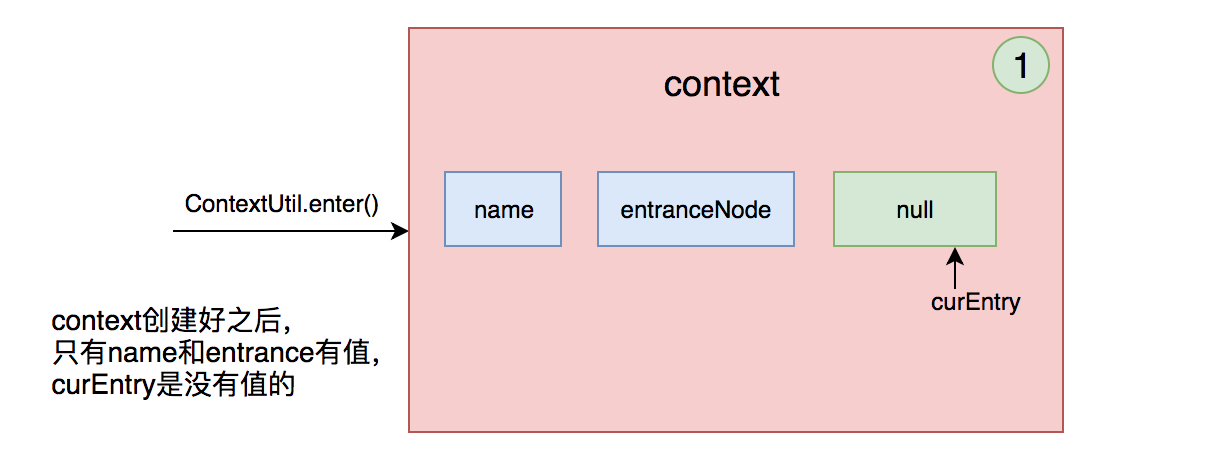
构造树干-创建context context的创建在上面已经分析过了,初始化的时候,context中的curEntry属性是没有值的,如下图所示:
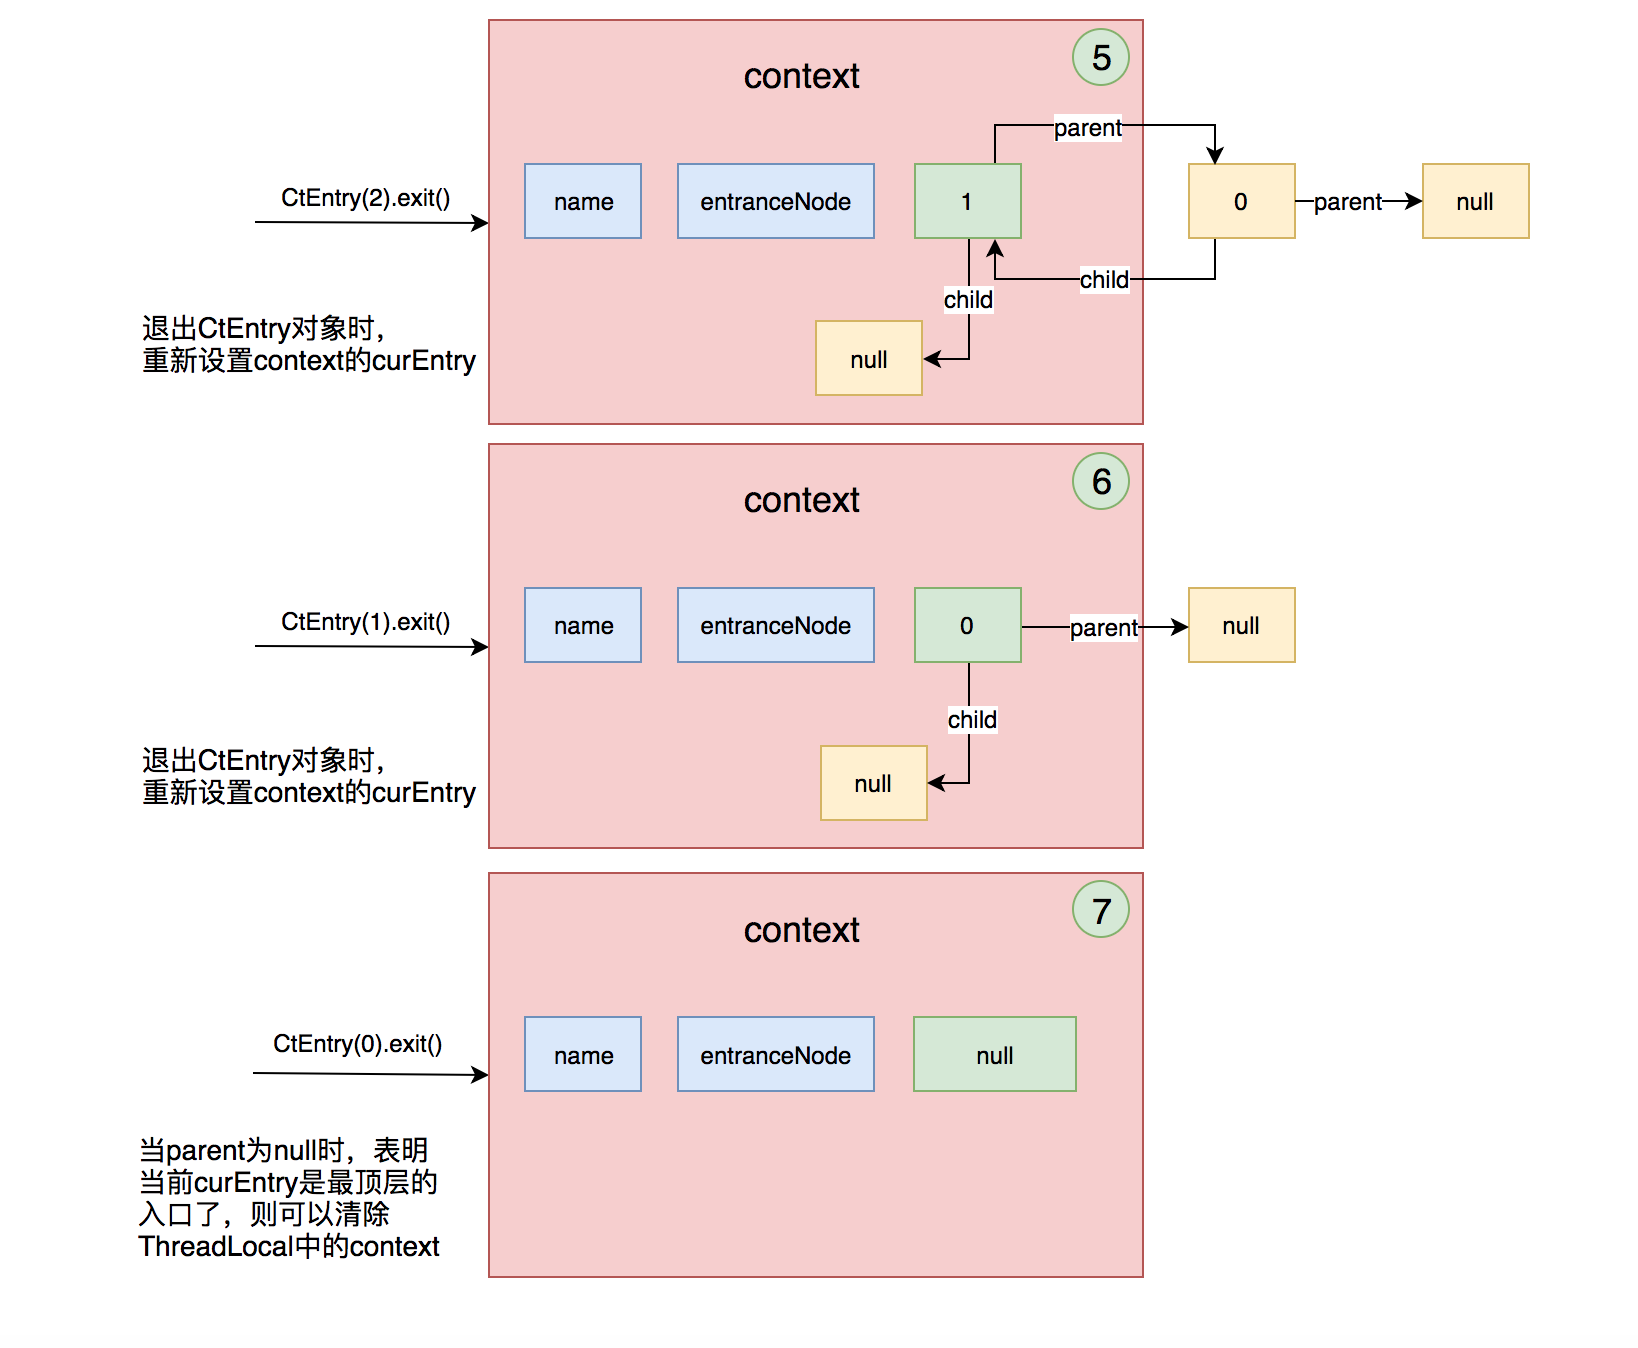
创建Entry 每创建一个新的Entry对象时,都会重新设置context的curEntry,并将context原来的curEntry设置为该新Entry对象的父节点,如下图所示:
退出Entry 某个Entry退出时,将会重新设置context的curEntry,当该Entry是最顶层的一个入口时,将会把ThreadLocal中保存的context也清除掉,如下图所示:
构造叶子节点 上面的过程是构造了一棵调用链的树,但是这棵树只有树干,没有叶子,那叶子节点是在什么时候创建的呢?
DefaultNode就是叶子节点,在叶子节点中保存着目标资源在当前状态下的统计信息。通过分析,我们知道了叶子节点是在NodeSelectorSlot的entry方法中创建的。具体的代码如下:
1 2 3 4 5 6 7 8 9 10 11 12 13 14 15 16 17 18 19 20 21 22 23 24 25 26 @Override public void entry (Context context, ResourceWrapper resourceWrapper, Object obj, int count, Object... args) throws Throwable DefaultNode node = map.get(context.getName()); if (node == null ) { synchronized (this ) { node = map.get(context.getName()); if (node == null ) { node = Env.nodeBuilder.buildTreeNode(resourceWrapper, null ); } ((DefaultNode)context.getLastNode()).addChild(node); } } context.setCurNode(node); fireEntry(context, resourceWrapper, node, count, args); }
上面的代码可以分解成下面这些步骤:
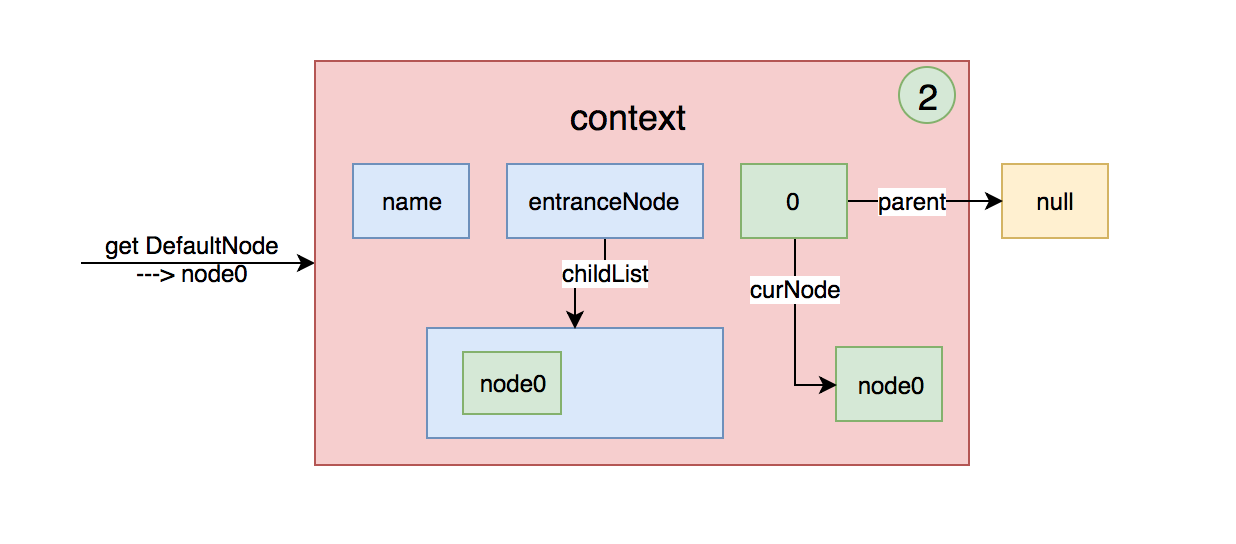
1)获取当前上下文对应的DefaultNode,如果没有的话会为当前的调用新生成一个DefaultNode节点,它的作用是对资源进行各种统计度量以便进行流控;
2)将新创建的DefaultNode节点,添加到context中,作为「entranceNode」或者「curEntry.parent.curNode」的子节点;
3)将DefaultNode节点,添加到context中,作为「curEntry」的curNode。
上面的第2步,不是每次都会执行。我们先看第3步,把当前DefaultNode设置为context的curNode,实际上是把当前节点赋值给context中curEntry的curNode,用图形表示就是这样:
保存子节点 上面已经分析了叶子节点的构造过程,叶子节点是保存在各个Entry的curNode属性中的。
我们知道context中只保存了入口节点和当前Entry,那子节点是什么时候保存的呢,其实子节点就是上面代码中的第2步中保存的。
下面我们来分析上面的第2步的情况;
第一次调用NodeSelectorSlot的entry方法时,map中肯定是没有DefaultNode的,那就会进入第2步中,创建一个node,创建完成后会把该节点加入到context的lastNode的子节点中去。我们先看一下context的getLastNode方法
1 2 3 4 5 6 7 8 9 10 11 12 public Node getLastNode () if (curEntry != null && curEntry.getLastNode() != null ) { return curEntry.getLastNode(); } else { return entranceNode; } }
代码中我们可以知道,lastNode的值可能是context中的entranceNode也可能是curEntry.parent.curNode,但是他们都是「DefaultNode」类型的节点,DefaultNode的所有子节点是保存在一个HashSet中的。
第一次调用getLastNode方法时,context中curEntry是null,因为curEntry是在第3步中才赋值的。
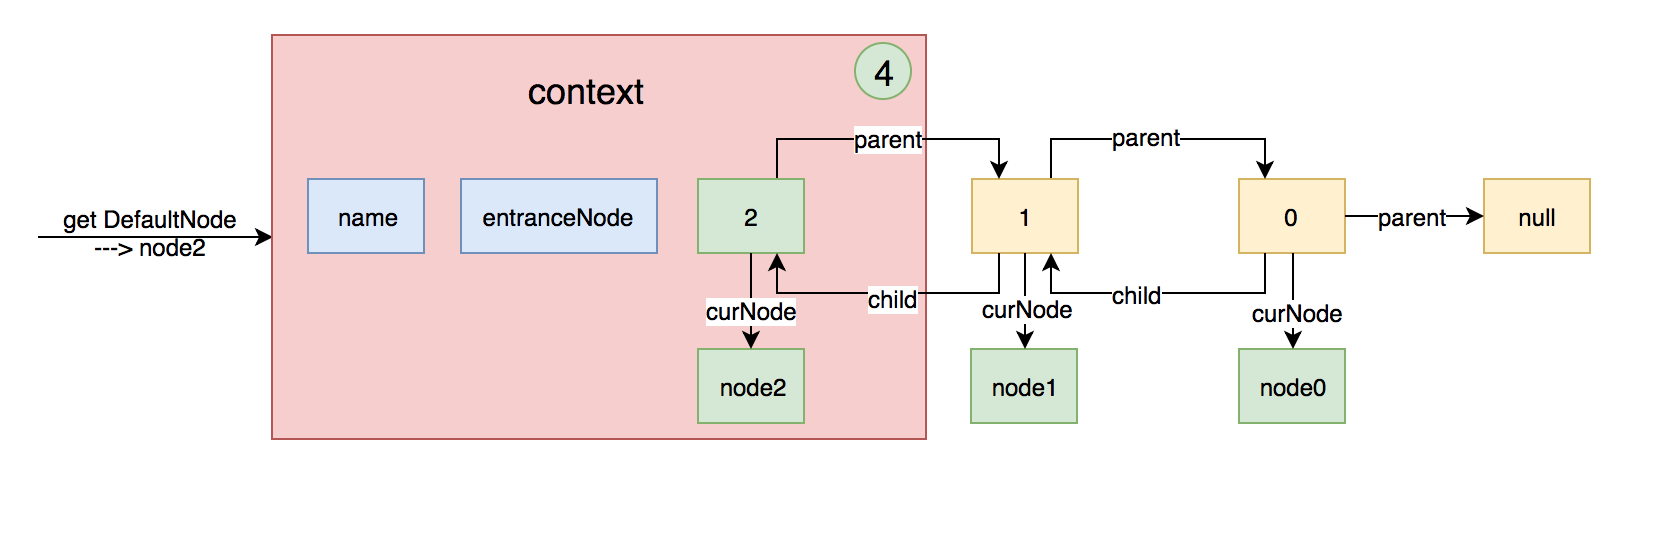
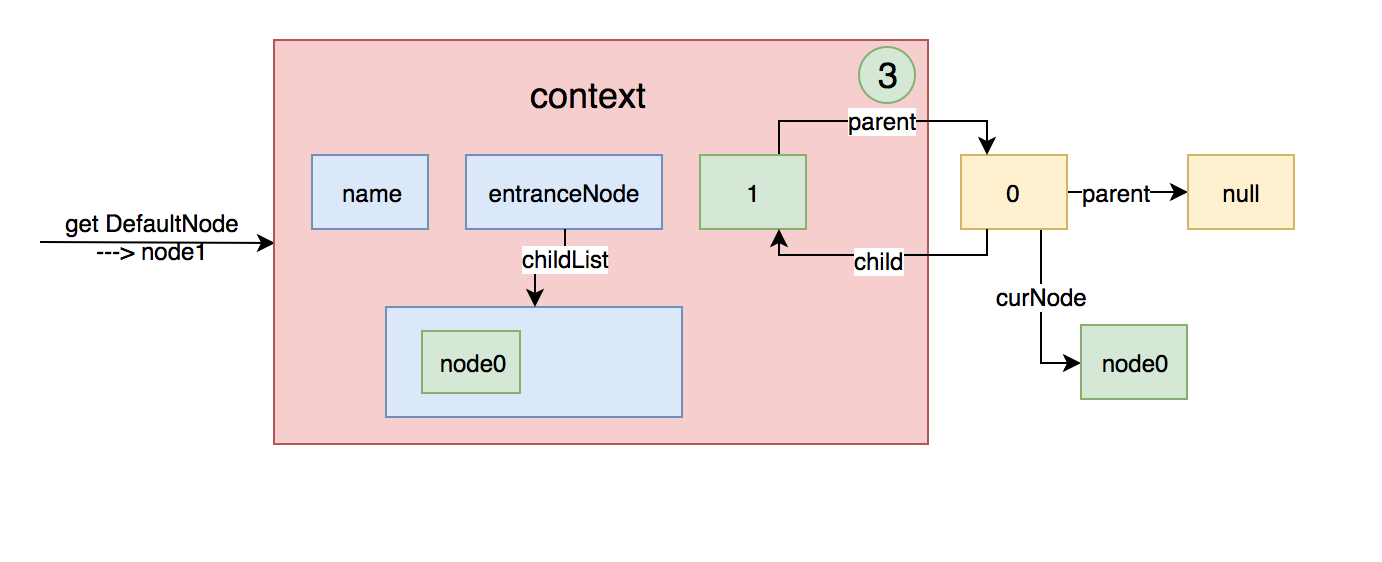
紧接着再进入一次,资源名不同,会再次生成一个新的Entry,上面的图形就变成下图这样:
此时再次调用context的getLastNode方法,因为此时curEntry的parent不再是null了
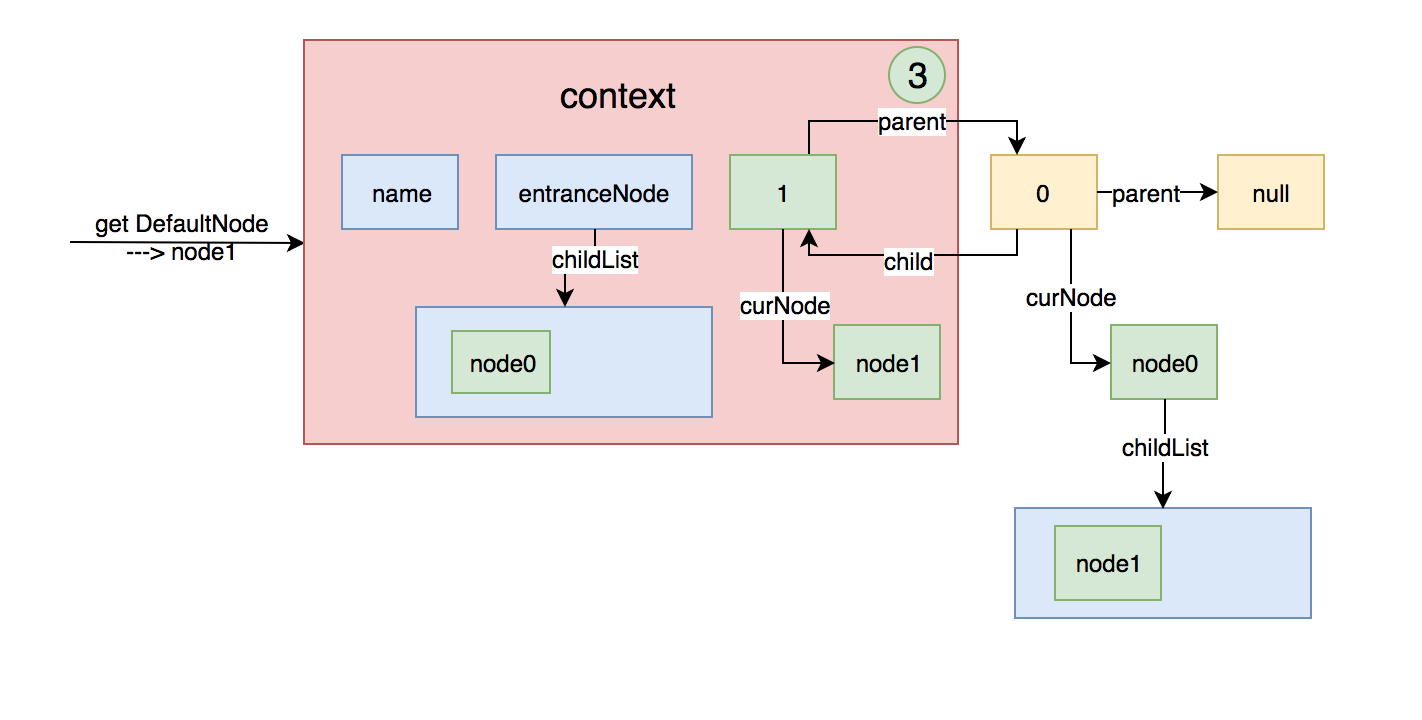
然后将当前node设置给context的curNode,上面的图形就变成下图这样:
假如再创建一个Entry,然后再进入一次不同的资源名,上面的图就变成下面这样:
至此NodeSelectorSlot的基本功能已经大致分析清楚了。
ClusterBuilderSlot NodeSelectorSlot的entry方法执行完之后,会调用fireEntry方法,此时会触发ClusterBuilderSlot的entry方法。
ClusterBuilderSlot的entry方法比较简单,具体代码如下:
1 2 3 4 5 6 7 8 9 10 11 12 13 14 15 16 17 18 19 20 21 22 23 @Override public void entry (Context context, ResourceWrapper resourceWrapper, DefaultNode node, int count, Object... args) throws Throwable if (clusterNode == null ) { synchronized (lock) { if (clusterNode == null ) { clusterNode = Env.nodeBuilder.buildClusterNode(); HashMap<ResourceWrapper, ClusterNode> newMap = new HashMap<ResourceWrapper, ClusterNode>(16 ); newMap.putAll(clusterNodeMap); newMap.put(node.getId(), clusterNode); clusterNodeMap = newMap; } } } node.setClusterNode(clusterNode); fireEntry(context, resourceWrapper, node, count, args); }
NodeSelectorSlot的职责比较简单,主要做了两件事:
PS:一个资源只有一个ClusterNode,但是可以有多个DefaultNode
StatistcSlot StatisticSlot负责来统计资源的实时状态,具体的代码如下:
1 2 3 4 5 6 7 8 9 10 11 12 13 14 15 16 17 18 19 20 21 22 23 24 25 26 27 28 29 30 31 32 33 34 35 36 37 38 39 40 @Override public void entry (Context context, ResourceWrapper resourceWrapper, DefaultNode node, int count, Object... args) throws Throwable try { fireEntry(context, resourceWrapper, node, count, args); node.increaseThreadNum(); node.addPassRequest(); } catch (BlockException e) { context.getCurEntry().setError(e); node.increaseBlockedQps(); throw e; } catch (Throwable e) { context.getCurEntry().setError(e); node.increaseExceptionQps(); throw e; } } @Override public void exit (Context context, ResourceWrapper resourceWrapper, int count, Object... args) DefaultNode node = (DefaultNode)context.getCurNode(); if (context.getCurEntry().getError() == null ) { long rt = TimeUtil.currentTimeMillis() - context.getCurEntry().getCreateTime(); if (rt > Constants.TIME_DROP_VALVE) { rt = Constants.TIME_DROP_VALVE; } node.rt(rt); node.decreaseThreadNum(); } fireExit(context, resourceWrapper, count); }
代码分成了两部分,第一部分是entry方法,该方法首先会触发后续slot的entry方法,即SystemSlot、FlowSlot、DegradeSlot等的规则,如果规则不通过,就会抛出BlockException,则会在node中统计被block的数量。反之会在node中统计通过的请求数和线程数等信息。第二部分是在exit方法中,当退出该Entry入口时,会统计rt的时间,并减少线程数。
这些统计的实时数据会被后续的校验规则所使用,具体的统计方式是通过滑动窗口来实现的。
SystemSlot SystemSlot就是根据总的请求统计信息,来做流控,主要是防止系统被搞垮,具体的代码如下:
1 2 3 4 5 6 7 8 9 10 11 12 13 14 15 16 17 18 19 20 21 22 23 24 25 26 27 28 29 30 31 @Override public void entry (Context context, ResourceWrapper resourceWrapper, DefaultNode node, int count, Object... args) throws Throwable { SystemRuleManager.checkSystem(resourceWrapper); fireEntry(context, resourceWrapper, node, count, args); } public static void checkSystem (ResourceWrapper resourceWrapper) throws BlockException double currentQps = Constants.ENTRY_NODE.successQps(); if (currentQps > qps) { throw new SystemBlockException(resourceWrapper.getName(), "qps" ); } int currentThread = Constants.ENTRY_NODE.curThreadNum(); if (currentThread > maxThread) { throw new SystemBlockException(resourceWrapper.getName(), "thread" ); } double rt = Constants.ENTRY_NODE.avgRt(); if (rt > maxRt) { throw new SystemBlockException(resourceWrapper.getName(), "rt" ); } if (highestSystemLoadIsSet && getCurrentSystemAvgLoad() > highestSystemLoad) { if (currentThread > 1 && currentThread > Constants.ENTRY_NODE.maxSuccessQps() * Constants.ENTRY_NODE.minRt() / 1000 ) { throw new SystemBlockException(resourceWrapper.getName(), "load" ); } } }
其中的Constants.ENTRY_NODE是一个全局的ClusterNode,该节点的值是在StatisticsSlot中进行统计的。
AuthoritySlot AuthoritySlot做的事也比较简单,主要是根据黑白名单进行过滤,只要有一条规则校验不通过,就抛出异常。
1 2 3 4 5 6 7 8 9 10 11 12 13 14 15 16 17 18 19 20 21 22 @Override public void entry (Context context, ResourceWrapper resourceWrapper, DefaultNode node, int count, Object... args) throws Throwable AuthorityRuleManager.checkAuthority(resourceWrapper, context, node, count); fireEntry(context, resourceWrapper, node, count, args); } public static void checkAuthority (ResourceWrapper resource, Context context, DefaultNode node, int count) throws BlockException if (authorityRules == null ) { return ; } List<AuthorityRule> rules = authorityRules.get(resource.getName()); if (rules == null ) { return ; } for (AuthorityRule rule : rules) { if (!rule.passCheck(context, node, count)) { throw new AuthorityException(context.getOrigin()); } } }
FlowSlot FlowSlot主要是根据前面统计好的信息,与设置的限流规则进行匹配校验,如果规则校验不通过则进行限流,具体的代码如下:
1 2 3 4 5 6 7 8 9 10 11 12 13 14 15 16 @Override public void entry (Context context, ResourceWrapper resourceWrapper, DefaultNode node, int count, Object... args) throws Throwable FlowRuleManager.checkFlow(resourceWrapper, context, node, count); fireEntry(context, resourceWrapper, node, count, args); } public static void checkFlow (ResourceWrapper resource, Context context, DefaultNode node, int count) throws BlockException List<FlowRule> rules = flowRules.get(resource.getName()); if (rules != null ) { for (FlowRule rule : rules) { if (!rule.passCheck(context, node, count)) { throw new FlowException(rule.getLimitApp()); } } } }
DegradeSlot DegradeSlot主要是根据前面统计好的信息,与设置的降级规则进行匹配校验,如果规则校验不通过则进行降级,具体的代码如下
1 2 3 4 5 6 7 8 9 10 11 12 13 14 15 16 @Override public void entry (Context context, ResourceWrapper resourceWrapper, DefaultNode node, int count, Object... args) throws Throwable DegradeRuleManager.checkDegrade(resourceWrapper, context, node, count); fireEntry(context, resourceWrapper, node, count, args); } public static void checkDegrade (ResourceWrapper resource, Context context, DefaultNode node, int count) throws BlockException List<DegradeRule> rules = degradeRules.get(resource.getName()); if (rules != null ) { for (DegradeRule rule : rules) { if (!rule.passCheck(context, node, count)) { throw new DegradeException(rule.getLimitApp()); } } } }
总结 sentinel的限流降级等功能,主要是通过一个SlotChain实现的。在链式插槽中,有7个核心的Slot,这些Slot各司其职,可以分为以下几种类型:
一、进行资源调用路径构造的NodeSelectorSlot和ClusterBuilderSlot
二、进行资源的实时状态统计的StatisticsSlot
三、进行系统保护,限流,降级等规则校验的SystemSlot、AuthoritySlot、FlowSlot、DegradeSlot
后面几个Slot依赖于前面几个Slot统计的结果。至此,每种Slot的功能已经基本分析清楚了。

国内查看评论需要代理~